Tools
1Password
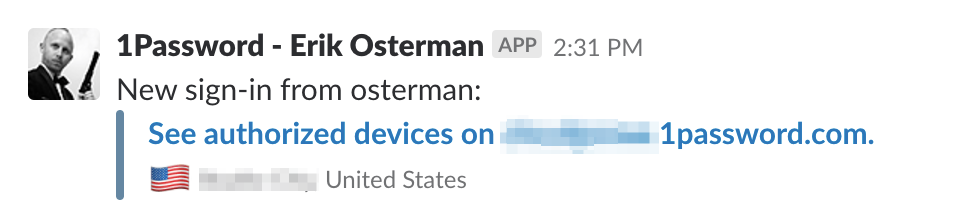
The 1Password for Teams product by AgileBits is arguably the most popular SaaS-based password management tool. In our opinion, it offers a better user experience over apps like LastPass as well as provides integration with Duo and Slack for real-time activity notifications.
Best Practices
Here are some of our recommended practices for working with 1Password. If your organization choses an alternative password management solution, we recommend implementing compensating controls.
Enable Real-time Slack Notifications
With real-time slack notifications, you'll be able to monitor logins for anomalies.
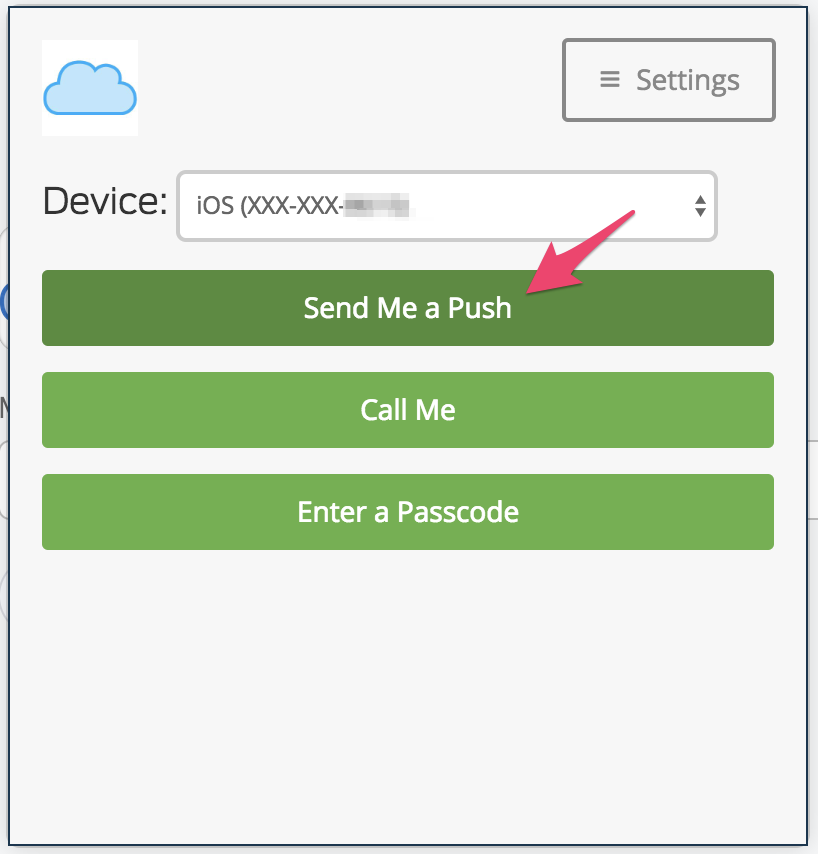
Duo Integration for MFA
Leverage Duo push notifications for MFA. With Duo, you can do full-on geofencing to ensure logins do not come from untrusted locations.
Create Role-based Teams
Define teams in terms of roles (E.g. production-admin, staging-admin, dns, finance, etc).
AWS Master Credentials
We use 1Password to store the AWS Master Account "root" credentials. Share OTP (MFA) codes with trusted admins.

AWS CLI
The AWS Command Line Interface (CLI) is a command line tool to manage multiple AWS services and is useful for shell automation using scripts.
Delete all versions of objects in an S3 bucket
export BUCKET=foobar
aws s3api delete-objects --bucket $BUCKET \
  --delete "$(aws s3api list-object-versions --bucket $BUCKET | \
  jq -M '{Objects: [.["Versions","DeleteMarkers"][]|select(.Key == "key-value")| {Key:.Key, VersionId:.VersionId}], Quiet: false}')"
via: stackoverflow
(Deprecated) AWS Vault
(Deprecated) The aws-vault command line tool by 99 Designs is a utility for securely storing and accessing encrypted AWS credentials for use in development environments. This tool makes it easy to work with IAM assumed roles across multiple AWS organizations.
Cloud Posse no longer recommends this tool or workflow now that AWS supports federated login
(meaning users never need long-lived AWS API keys) and the current AWS SDKs take a Role ARN
as a parameter and automatically assume the role. We recommend Leapp for managing
initial credentials. With the AWS SDK enhancements, Terraform and the aws CLI, and by
extension EKS (which we now recommend over kops), will automatically assume the roles as
needed, removing the need to manually assume a role.
aws-vault has no relationship to the HashiCorp Vault.
Features
- Encrypted vault for IAM credentials (OSX KeyChain or file)
- IAM Metadata server (mocks the EC2 API) to simulate instance profiles for local development
- Prompts for MFA Token
- Variable-length session TTLs
- Compatible with
~/.aws/config - Automatic logins to AWS Web Console
(Deprecated) Local Configuration
We recommend using the file type backend for aws-vault because this is compatible with Linux, which is needed for Geodesic sessions.
Add the following to your ~/.bashrc:
export AWS_VAULT_BACKEND="file"
Then source ~/.bashrc to update your current session.
- Generate IAM Access Key ID/Secret on your AWS root account via IAM management page in the AWS Console.
Do not define the source profile in ~/.aws/credentials; we're going to use aws-vault add for that.
- Using the IAM Access Key ID/Secret generated in Step 1, add the
source_profile:
$ aws-vault add example
- Add the
source_profilecreated in Step 2 to your~/.aws/config.
[profile example]
region=us-west-2
- Setup your
~/.aws/configby adding a profile entry for each AWS account:cautionRemember to replace the
$aws_account_ids with your account ids and[email protected]with your IAM username below. We recommend using email addresses for all IAM user accounts associated with human users.
[profile example-staging-admin]
region=us-west-2
role_arn=arn:aws:iam::$aws_account_id_for_staging:role/OrganizationAccountAccessRole
mfa_serial=arn:aws:iam::$aws_account_id_for_root:mfa/[email protected]
source_profile=example
- Test that it is all set up properly:
$ aws-vault login example-staging-admin
This should open a browser and log you into the AWS console as the assumed role example-staging-admin.
(Obsolete) Using with Geodesic
aws-vault is no longer preinstalled in the Geodesic shell. It is available
as a package named "aws-vault" in the Cloud Posse package repository, and
you can install it at run time by running the appropriate commands
for your Geodesic Linux distro (e.g. apt-get install aws-vault for Debian),
or you can put a corresponding RUN command in your Dockerfile to install it
at build time.
To start the shell, run:
$CLUSTER_NAME
Add your profile to AWS Vault
Now we are ready to configure your AWS credentials. To add your AWS credentials to the encrypted vault run the following command. Remember to replace example with your source profile name.
aws-vault add example
Troubleshooting
Most problems stem from misconfiguration. Note: aws-vault configuration conflicts
with the currently recommended Leapp workflow and configuration.
- Do not define a
[default]profile in~/.aws/credentialsor[profile default]in~/aws/config - Do not set
AWS_SDK_LOAD_CONFIG - Do not set
AWS_SHARED_CREDENTIALS_FILE
If using --server mode, ensure the following credentials are not exported:
Since running aws-vault using --server binds to the 169.254.169.254 local ip address to mock the AWS metadata server, you can run only one process per host machine.
AWS_ACCESS_KEY_IDAWS_SECRET_ACCESS_KEYAWS_SECURITY_TOKENAWS_SESSION_TOKEN
Use unset to delete each of the above variables from your environment and ensure they aren't exported in your ~/.bashrc or ~/.profile.
Build Harness
The build-harness is a collection of Makefiles to facilitate building stuff. It supports Golang projects, Dockerfiles, Helm charts, and much more.
| GitHub Repo | https://github.com/cloudposse/build-harness/ |
| Build Status |  |
| Release |  |
It's designed to work with CI/CD systems such as GitHub Action, Codefresh, Jenkins, and others.
It's 100% Open Source and licensed under APACHE2.
Usage
At the top of your Makefile add, the following...
-include $(shell curl -sSL -o .build-harness "https://cloudposse.tools/build-harness"; echo .build-harness)
This will download a Makefile called .build-harness and include it at run-time. We recommend adding the .build-harness file to your .gitignore.
This automatically exposes many new targets that you can leverage throughout your build & CI/CD process.
Run make help for a list of available targets.
The / in target names is interchangeable with the : in target names
Real World Examples
We leverage the build-harness in nearly every project on our GitHub.
| Example Repo | Usage |
|---|---|
charts | A collection of Helm Charts that leverages docker/% and helm/% targets |
terraform-null-label | A terraform module that leverages terraform/% targets |
Chamber
Chamber is a CLI for managing secrets stored in AWS Systems Manager Parameter Store.
In the article The Right Way to Store Secrets using Parameter Store, AWS recommends using chamber for secrets management.
Usage
Using chamber you can perform all standard CRUD operations on secrets stored in AWS SSM and execute commands with environment variables populated from the secrets. For a complete description, check out the official documentation.
Geodesic

| GitHub Repo | https://github.com/cloudposse/geodesic |
| Release |  |
| Build Status |
Introduction
Geodesic is our Docker Based Toolbox. It's a DevOps Linux Distro distributed as a docker image that has all the essential tools for automation of AWS, kubernetes, etc. The toolbox can be used as a docker base image in order to ship consistent tooling and we provide packages for all popular devops tools.
Demo
At its core, Geodesic is a DevOps toolkit Linux Distro distributed via Docker for provisioning cloud infrastructure and the applications that sit on top of it. We leverage as many existing tools as possible to facilitate cloud fabrication and administration. Geodesic is like the connective tissue that sits between all of the components of a modern cloud.
Technologies
| Tool | Purpose |
|---|---|
terraform | for provisioning miscellaneous resources on pretty much any cloud |
aws-cli | for interacting directly with the AWS APIs (E.g. s3, ec2, rds) |
helm | for installing packages like nginx-ingress or datadog agent on the Kubernetes cluster |
kubectl | for controlling kubernetes resources like deployments, pods, configmaps, etc. |
gomplate | for template rendering configuration files using the GoLang template engine. Supports lots of local and remote data sources |
goofys | for mounting encrypted S3 buckets that store cluster configurations and secrets |
chamber | for managing secrets with AWS SSM+KMS |
atmos | for orchestrating terraform or helmfile automation |
turf | for orchestrating automation tasks that are difficult to automate via IaC |
Our Logo
In mathematics, a geodesic line is the shortest distance between two points on a sphere. It's also a solid structure composed of geometric shapes such as hexagons.
We like to think of geodesic as the shortest path to a rock-solid cloud infrastructure. The geodesic logo is a hexagon with a cube suspended at its center. The cube represents this geodesic container, which is central to everything and at the same time is what ties everything together.
But look a little closer and you'll notice there's much more to it. It's also an isometric shape of a cube with a missing piece. This represents its pluggable design, which lets anyone extend it to suit their vision.
Gomplate
A flexible commandline tool for template rendering. Supports lots of local and remote datasources.
Why Gomplate?
The Go progamming language supports native templating. The problem is that there aren't very many functions supported out-of-the-box and it cannot be called from the command line.
Gomplate is a CLI tool that addresses this need. That is, it can be used as an alternative to envsubst, but also supports
additional template data-sources such as: JSON, YAML, and even AWS EC2 metadata.
We love envsubst for its super-minimalist template processing, but sometimes more advanced templating with conditions is necessary. We use gomplate to parameterize a number of critical files across our architectures. Gomplate is an alternative to envsubst that provides some useful built-in functions to make templates even more expressive.
References
Goofys
Goofys a high-performance, POSIX-ish Amazon S3 file system written in Go. We use goofys as part of Geodesic to provide our own S3 filesystem interface for mounting buckets securely inside a container for the purpose of storing master SSH keys needed by EC2 instances.
Why Goofys?
Goofys is similar to the original s3fs FUSE filesystem, but written in Golang and much, much faster. Also, it works seamlessly with EC2 instance profiles for assumed-roles, which s3fs-fuse does not support as of v1.82.
The reason why goofys is faster is that it implements a subset of the POSIX filesystem semantics. Namely, it only supports read, write and append operations. This makes it suitable for many simple use-cases, but not suitable for running things like a database.
Helm

Helm makes it easy to install charts (an application) on kubernetes clusters. Just like npm or apt make it easy to install NodeJS modules and Debian packages, helm makes it easy to deploy a full-fledged application with all of its dependencies on kubernetes.
Delete All Releases in Namespace
To delete all helm releases in NAMESPACE, run the following command:
helm list --namespace $NAMESPACE --short | xargs helm delete --purge
Deleting releases will not delete the namespace itself. This is because there may be other artifacts. For a more detailed discussion on the pros & cons of this, check out the GitHub issue tracking this topic.
Then after running this command, to delete the namespace, run:
kubectl delete namespace $NAMESPACE
Helmfile
We use helmfile to deploy collections of charts. The helmfile.yaml is a declarative configuration file that makes it easier to deploy and manage a large number of helm charts.
Another way to think about it is like this:
If
helmis responsible for deploying a single application to kubernetes, thenhelmfileis responsible for deploying multiple applications by callinghelm.
Features
- 12-Factor Style Configurations - Parameterize all charts using Environment Variables
- Inline
values.yaml- Maintain changes to chart configurations in version control - Chamber Compatibility - Use
chamberto deploy helm charts with secrets pulled from SSM - CI/CD Integration - Easily integrate
helmfilewith CI/CD pipelines using ourbuild-harness - Synchronize Environments - Rapidly deploy or update all services for a cluster
- Go Templating - Configuration is templatized using Go template and supports all the Sprig intepolation functions.
Use-cases
- We recommend using a
helmfileanywhere you need to deploy a helm chart. This is becausehelmdoes not support environment variables out-of-the-box. - The
helmfilereduces the need for complex umbrella charts that are more difficult to manage.
Dependencies
Helmfile depends on the following cli tools.
geodesic shell ships with all dependencies.
Prior to using helmfile, you'll need a valid kubectl context.
Alternatively, set the KUBE_CONTEXT when using helmfile with a Codefresh pipeline.
Configuration File
The helmfile.yaml is a go-template formatted "YAML" file. Note, this means that it is first evaluated as a plain-text go-template before getting processed as YAML. It essential that the go-template result in well-formed YAML with properly escaped values.
For complete examples, review our comprehensive distribution of helmfiles.
Example helmfile.yaml
Here's an example helmfile.yaml. Note that it's possible to use conditionals (e.g. if / else).
#
# Helm Chart Repositories
#
repositories:
  # Stable repo of official helm charts
  - name: "stable"
    url: "https://kubernetes-charts.storage.googleapis.com"

{{ if env "CHART_REPO_URL" }}
  # Local chart repo
  - name: "chart-repo"
    url: '{{ env "CHART_REPO_URL" }}'
{{ end }}

#
# Kubernetes
#
context: '{{ env "KUBE_CONTEXT" }}'

#
# Helm Releases
#
releases:
  # Postgres
  - name: '{{ env "RELEASE_NAME" }}-pg'
    labels:
      chart: "postgresql"
      component: "database"
    chart: "stable/postgresql"
    version: "0.11.0"
    namespace: '{{ env "NAMESPACE" }}'
    set:
      - name: "image"
        value: "cloudposse/postgres"
      - name: "imageTag"
        value: '{{ coalesce (env "POSTGRES_IMAGE_TAG") "0.2.1" }}'
      - name: "imagePullSecrets"
        value: '{{ env "RELEASE_NAME" }}-pull-secret-dockercfg'
      - name: "postgresDatabase"
        value: '{{ env "POSTGRES_DB" }}'
      - name: "postgresUser"
        value: '{{ env "POSTGRES_USER" }}'
      - name: "postgresPassword"
        value: '{{ env "POSTGRES_PASSWORD" }}'
Environment Variables
There are two options for retrieving environment variables.
The env function will simply retrieve the environment variable. If it does not exist, it will return an empty string. Combined with the default function, it's possible to set a default value.
{{ env "POSTGRES_USER" }}
The other option is to call requiredEnv. This method is not recommended.
{{ requiredEnv "POSTGRES_USER" }}
This will throw an exception if the environment variable (POSTGRES_USER) is not set. While this sounds like a great feature, it's actually problematic because sometimes we only want to sync a particular chart using the --selector argument. In this case, we shouldn't need to set all environment variables - only the ones relevant to the chart we're installing. If the helmfile.yaml is using requiredEnv, all those environment variables will need to be defined. For this reason, we do not recommend using `requiredEnv.
Default Values
{{ env "POSTGRES_USER" | default "postgres" }}
An alternative way to express this is with the coalesce function (Sprig function).
{{ coalesce (env "POSTGRES_USER") "postgres" }}
Arguments
NAME:
   helmfile -

USAGE:
   helmfile [global options] command [command options] [arguments...]

COMMANDS:
     repos   sync repositories from state file (helm repo add && helm repo update)
     charts  sync charts from state file (helm upgrade --install)
     diff    diff charts from state file against env (helm diff)
     sync    sync all resources from state file (repos, charts and local chart deps)
     status  retrieve status of releases in state file
     delete  delete charts from state file (helm delete)
     test    test releases from state file (helm test)

GLOBAL OPTIONS:
   --file FILE, -f FILE         load config from FILE (default: "helmfile.yaml")
   --quiet, -q                  silence output
   --namespace value, -n value  Set namespace. Uses the namespace set in the context by default
   --selector,l value           Only run using the releases that match labels. Labels can take the form of foo=bar or foo!=bar.
                                  A release must match all labels in a group in order to be used. Multiple groups can be specified at once.
                                  --selector tier=frontend,tier!=proxy --selector tier=backend. Will match all frontend, non-proxy releases AND all backend releases.
                                  The name of a release can be used as a label. --selector name=myrelease
   --kube-context value         Set kubectl context. Uses current context by default
   --help, -h                   show help
   --version, -v                print the version
Example: Sync All Charts
To deploy all charts defined in the helmfile.yaml, simply run helmfile sync. Typically, we do not run this, however, because a helmfile.yaml will define many more charts than installed on the cluster.
Example: Sync Specific Charts
A helmfile.yaml may contain dozens of charts. To target specific charts, just pass the --selector argument to helmfile. Multiple label constraints can be specified by concatenating them with a , (comma). This works like a logical "and".
Alternatively, the --selector argument may be passed multiple times which works like a logical "or"; each parameter is resolved independently so a release that matches any parameter will be used.
For example, to sync all charts that have the default: true label, we would run:
helmfile --selector default=true sync
To sync all default charts, but exclude one in particular (e.g. chartmuseum), we could run something like:
helmfile --selector 'default=true,chart!=chartmuseum' sync
To sync all default charts or chartmuseum, we would run:
helmfile --selector 'default=true' --selector 'chart=chartmuseum' sync
Example: Helmfile with Chamber
We prefer to use SSM as the system of record for all secrets. To export those secrets as environment variables for usage with helm, run the following command:
chamber exec $service -- helmfile sync
References
Hugo

Hugo is one of the most popular open-source static site generators. It also happens to be a rediculously fast framework for building static websites. We use it to build our documentation.
What we like about it is that it's written in Go, speaks "markdown" and uses Go-templates for rendering all pages.
Kubectl
kubectl is the command line tool (cli) for running commands against Kubernetes clusters. Think of it like the AWS CLI to Kubernetes clusters.
Leapp
Leapp is a GUI tool run on the host computer that manages cloud
credentials such as AWS keys. It integrates with Geodesic via the host file system's
$HOME directory. Leapp stores temporary credentials in the standard AWS shared credentials
file $HOME/.aws/credentials (note that all AWS libraries cache temporary credentials
on the local file system), which Geodesic makes available inside the running container.
Leapp runs a daemon process on the host to refresh the credentials as needed, allowing
them to be as short-lived as possible without requiring human intervention to refresh them.
Make
The make command has been around for decades. Predominantly, it was used to build complex projects in C & C++, but it's seen a resurgence in the ops world for automating routine tasks and orchestration of infrastructure-as-code. In the 12-factor pattern, these are your “admin tasks”.
Understanding Makefiles
Because make is a very simple language, there's not very much you need to learn to get started. Some things, however, might seem unintuitive when approaching it from the perspective of other languages. Namely, make is really a template engine that renders “stubs” and then executes those stubs in a shell. Environment variables can be considered as the arguments to those targets.
The reason for using make is that it's supposed to be less magical. It's such a basic language it should be hard to do something wrong. It defines every action you could possibly want to take and provides a consistent interface for calling those targets. Environment variables are used everywhere, so it's very configurable and also 12-factor-esque.
On the other hand, something like bash is more full-featured, but suffers from some of the early criticisms of PHP. Most shell-scripts suck. They don't check exit codes. They don't accept arguments in consistent fashion. They don't use environment variables. They hardcode settings. They end up looking like spaghetti.
Variables
Part of the confusion around make is that make variables (e.g. $(FOO)) resemble shell-like variables (e.g. $FOO or ${FOO}). Note, that in bash using $(....) is synonymous using ... (which will run the command).
In make, variables are synonymous to environment variables. They can be defined ad-hoc on the command line or at the top of the Makefile.
make something FOO=bar
or
Makefile:
FOO=bar
It's important to note that everything after the = is treated literally. Thus quotes (“) are not necessary, unlike in bash.
Built-in Functions
There are many built-in functions. A few of the most common uses are explained below.
$(call foobar,arg1,arg2)
This will call a macro called "foobar"
$(shell /bin/ls)
This will run the command “/bin/ls” and output the results. Results always have new-lines & carriage returns stripped off. There's no way around it.
$(eval FOO=bar)
This will evaluate the “FOO=bar” as “make” language formatted code. In this case, since “FOO=bar” is how a variable is defined, the result is that a variable named FOO gets set to bar in the global make namespace.
Macros
TBD
Targets
Targets are like “functions”. They can run any shell command. Those shell commands can be other scripts or apps like terraform or system commands. The make command is basically a “bash” template engine: every line of a make target is a one-line shell script. Think of the contents of a target as “stubs” or “scriptlets”.
Make Evaluation
- Treat entire target contents as a template
- Render all variables, functions and macros
- Then execute each line as a standalone shell script, which is executed in a sub-shell (
/bin/bash`` -c “......”)
Defintion
There are 3 ways target names can be defined.
:- the default way. allows exactly one target to use this name. if another target attempts to use the same name, you'll see a warning::- this works like #1, but allows a target to be redefined in multiple places. This is nice when you want to decompose a Makefile into many sub-makefiles. e.g.deps::is a good target to define this way, since multiple makefiles might want to define dependencies.%:- This is a wildcard. You might want to do this if you want to write one target for multiple use-cases. For example, the following example could be used to create a target that installs a brew package (e.g.make install-vim)
install-%:
    brew install $(subst,install-,)
Dependencies
Targets require other targets. Just add those targets after the colon (:)
For example....
deps:
    @which -s envsubst || brew install gettext

replace: deps
    @envsubst < something.sh > something.txt
WARNING:
If your target name contains an escaped color (\:), builds deps do not work.
The following example does not work.
example\:test:
    @echo "Hello world!"

example\:broken: example:text
Workaround: call make as part of your target. This work basically the sameway, however, since it will be called in a subshell, it cannot modify the parent process environment in anyway.
example\:test:
    @echo "Hello world!"

example\:broken:
    @make example:text
Examples
Below are some annotated examples with explanations of what's going on.
Example 1
The basisc syntax is like this:
TMP_FILE = /tmp/test
foobar:
    touch $(TMP_FILE)
    rm $(TMP_FILE)
In this example, foobar is the target name. The leading spaces are all tabs (e.g. ^I)
- It runs a command called “
touch /tmp/test”. If that command exits 0 (success), then it will proceed to the next line. If the command exits non-zero, it's considered a failure and everything aborts at that point. - It runs the command “rm /tmp/test”
But behind the scenes though, a lot more is happening. This is the ROOT OF ALL MISUNDERSTANDINGS.
The contents of a Makefile target are a template. Think “envsubst”, only instead of simply replacing environment variables, the template supports make syntax. The make syntax has been described above and includes variables, functions, and macros.
Let's break down the execution of the example above.
    touch $(TMP_FILE)
    rm $(TMP_FILE)
Gets first rendered as a template.
The output would look like this:
    touch /tmp/test
    rm /tmp/test
Then, make will proceed to process the output data. Every line output is executed in it's own shell, unless the line ends with a backslash (e.g. \). The shell is determined by the value of the SHELL variable. We usually default this to bash.
Make then executes the following
/bin/bash -c “touch /tmp/test”/bin/bash -c “rm /tmp/test”
Note, by default, make will output each command run. This can be turned off by adding an @ at the beginning of the lines. This is a make-ism and nothing to do with shell. Remember, make is really just a template language.
Example 2
Now that we've explained how commands are executed, let's introduce a more complicated example that uses $(eval ...)
foobar:
    @echo "TODAY=wednesday" > /tmp/env
    $(eval -include /tmp/env)
    @echo "Today is: '$(TODAY)'"
This would output:
Today is: ''
Why? Let's re-evaluate this file the way make looks at it.
Here's what our template looks like:
    @echo "TODAY=wednesday" > /tmp/env
    $(eval -include /tmp/env)
    @echo "Today is: '$(TODAY)'"
- Make will first render the template. It does this by first processing all make directives. These are everything in
$(....). - It finds
$(eval -include /tmp/env). This says to include the contents of/tmp/envinto the current scope. If the file/tmp/envdoes not exist, it will not error and silently continue. Without the leading-, it would exit if the file does not exist (which it doesn't in this example - readon for more details). /tmp/envdoes not exist, so nothing got included. Even if it did exist, it would be from some previous execution- Then it finds
$(TODAY)which is not set, so it's evaluated to an empty string. - All
$(...)processing is complete, so the rendered contents look like:
@echo "TODAY=wednesday" > /tmp/env
@echo "Today is: ''"`
- Make proceeds to execute the contents, line by line
/bin/bash -c 'echo “TODAY=wednesday” > /tmp/env'/bin/bash -c 'echo "Today is: \'\'"'- And finally, we see something on our terminal:
Today is: ''
Example 3
Here's another example that demonstrates how literally these templates are interpreted.
foobar:
    #@echo "Hello $(shell date)"
Will first render the $(shell date) function which calls the date command and returns Thu Feb 23 07:01:14 UTC 2017, then execute the line in a sub-shell like this:
/bin/bash -c '#@echo "Hello Thu Feb 23 07:01:14 UTC 2017"'
Thus, to avoid this unnecessary execution, it's recommend to place all comments (#) at the very beginning of the line.
foobar:
##    @echo "Hello"
Example 4
Here's an example of a multi-line bash script
foobar:
    @if [ -d /tmp/test ]; then \
        echo "Directory exists"; \
        exit 0; \
     else \
        echo "Directory does not exist"; \
        exit 1; \
     fi
Here we execute in a single bash execution, the inline script above. Note that all the line endings use a combination of ; and \ depending on context.
Example 5
foobar:
    @export MONTH=February
    @echo $${MONTH}
This will output nothing but a new line \n because what happens is export MONTH=February is executed and exported in the first subshell, but a subshell cannot modify the environment of the parent process (make).
Then when the echo runs, we try and output ${MONTH} (in bash-syntax) and it's empty.
Note: we escape the dollar-sign with an extra $ to avoid make from attempting to interpret it. Make always has priority since it's preprocessing the contents of the template looking for functions and variables.
To correct this, we could instead write:
foobar:
    @export MONTH=February; \
    echo $${MONTH}
Packages
"Packages" is the Cloud Posse distribution of native apps. Use this repo to easily install binary releases of popular apps such as all of our standard tools mentioned in this doc. This is useful for inclusion into a Dockerfile to install dependencies.
Usage
Clone the repo.
git clone [email protected]:cloudposse/packages.git
See all available packages:
make -C packages/install help
Install everything...
make -C packages/install all
Install specific packages:
make -C packages/install atmos chamber
Install to a specific folder:
make -C packages/install atmos INSTALL_PATH=/usr/bin
Add this to a Dockerfile to easily install packages:
RUN git clone --depth=1 -b master https://github.com/cloudposse/packages.git /packages && \
    rm -rf /packages/.git && \
    make -C /packages/install kubectl
Here's a real example of how we use it in geodesic.
Uninstall a specific package
make -C uninstall yq
Makefile Inclusion
Sometimes it's necessary to install some binary dependencies when building projects. For example, we frequently
rely on gomplate or helm to build chart packages.
Here's a stub you can include into a Makefile to make it easier to install binary dependencies.
export PACKAGES_VERSION ?= master
export PACKAGES_PATH ?= packages/
export INSTALL_PATH ?= $(PACKAGES_PATH)/vendor

## Install packages
packages/install:
        @if [ ! -d $(PACKAGES_PATH) ]; then \
          echo "Installing packages $(PACKAGES_VERSION)..."; \
          rm -rf $(PACKAGES_PATH); \
          git clone --depth=1 -b $(PACKAGES_VERSION) https://github.com/cloudposse/packages.git $(PACKAGES_PATH); \
          rm -rf $(PACKAGES_PATH)/.git; \
        fi

## Install package (e.g. helm, helmfile, kubectl)
packages/install/%: packages/install
        @make -C $(PACKAGES_PATH)/install $(subst packages/install/,,$@)

## Uninstall package (e.g. helm, helmfile, kubectl)
packages/uninstall/%:
        @make -C $(PACKAGES_PATH)/uninstall $(subst packages/uninstall/,,$@)
Here's a real example of how we use it.
Teleport
Teleport is a BeyondCorp solution to provide the unified access plane for infrastructure.
Terraform
We use terraform as one of our most central tools for automating infrastructure. It's the predominate, cloud agnostic Infrastructure as Code (IaC) tool. We leverage terraform wherever possible to create composable, automated infrastructure architectures.
Learn more: