AWS Identity Center (SSO) ClickOps
This guide provides an overview of setting up AWS Identity Center (SSO) with ClickOps, detailing prerequisites and supported external identity providers. It explains how to integrate AWS SSO with providers like Azure AD, JumpCloud, Okta, and Google Workspace, including specific steps for configuring each.
How it Works
AWS Single Sign-On (AWS SSO) is a service that simplifies access management for AWS accounts and applications. It enables users to sign in to AWS once and access multiple AWS accounts and applications without the need to re-enter credentials. To use it with an identity provider (IdP) for AWS SSO, administrators typically need to configure the integration within the AWS Management Console. This involves setting up a new AWS SSO instance, connecting it to the IdP, and specifying the users or groups that should have access to AWS resources. AWS SSO provides logging and auditing capabilities, allowing organizations to track user access to AWS resources and monitor security-related events.
1 SAML-Based Authentication
The integration between the IdP and AWS SSO relies on the Security Assertion Markup Language (SAML) for authentication and authorization. SAML enables the exchange of authentication and authorization data between your IdP and AWS, allowing users to log in once to their IdP and gain access to AWS resources without additional logins.
2 User Provisioning
AWS SSO can be configured to automatically provision and de-provision user accounts based on changes in the IdP directory. This helps keep user access in sync with changes made in your IdP.
3 AWS SSO Permission Sets
AWS SSO allows administrators to define fine-grained access policies, specifying which AWS accounts and services users from the IdP can access.
4 Multi-Factor Authentication (MFA)
Organizations using an IdP for authentication with AWS SSO can enhance security by enforcing multi-factor authentication (MFA) for added identity verification.
Once configured, users can experience single sign-on when accessing AWS resources. They log in to their IdP account and seamlessly gain access to AWS without needing to provide credentials again.
It's important to note that the specifics of the integration process may be subject to updates or changes, so it's recommended to refer to the official AWS documentation and your IdP's documentation for the most accurate and up-to-date information.
Prerequisites
First, enable the AWS IAM Identity Center (successor to AWS Single Sign-On) service in the core-root account. This is the account where the aws-sso component will be deployed.
- Navigate to the
core-rootaccount in the AWS Web Console - Select your primary region
- Go to AWS IAM Identity Center (successor to AWS Single Sign-On)
- Enable the service
Configure your Identity Provider
These are the instructions for the most common Identity Providers. Alternatives are available, but the steps may vary depending on the provider.
It's important to note that the specifics of the integration process may be subject to updates or changes, so it's recommended to refer to the official AWS documentation and respective IdP documentation for the most accurate and up-to-date information based on your current date.
For providers not included in the following section, please follow the AWS documentation for setting up an IdP integration with AWS. This list includes Azure AD, CyberArk, OneLogin, and Ping Identity.
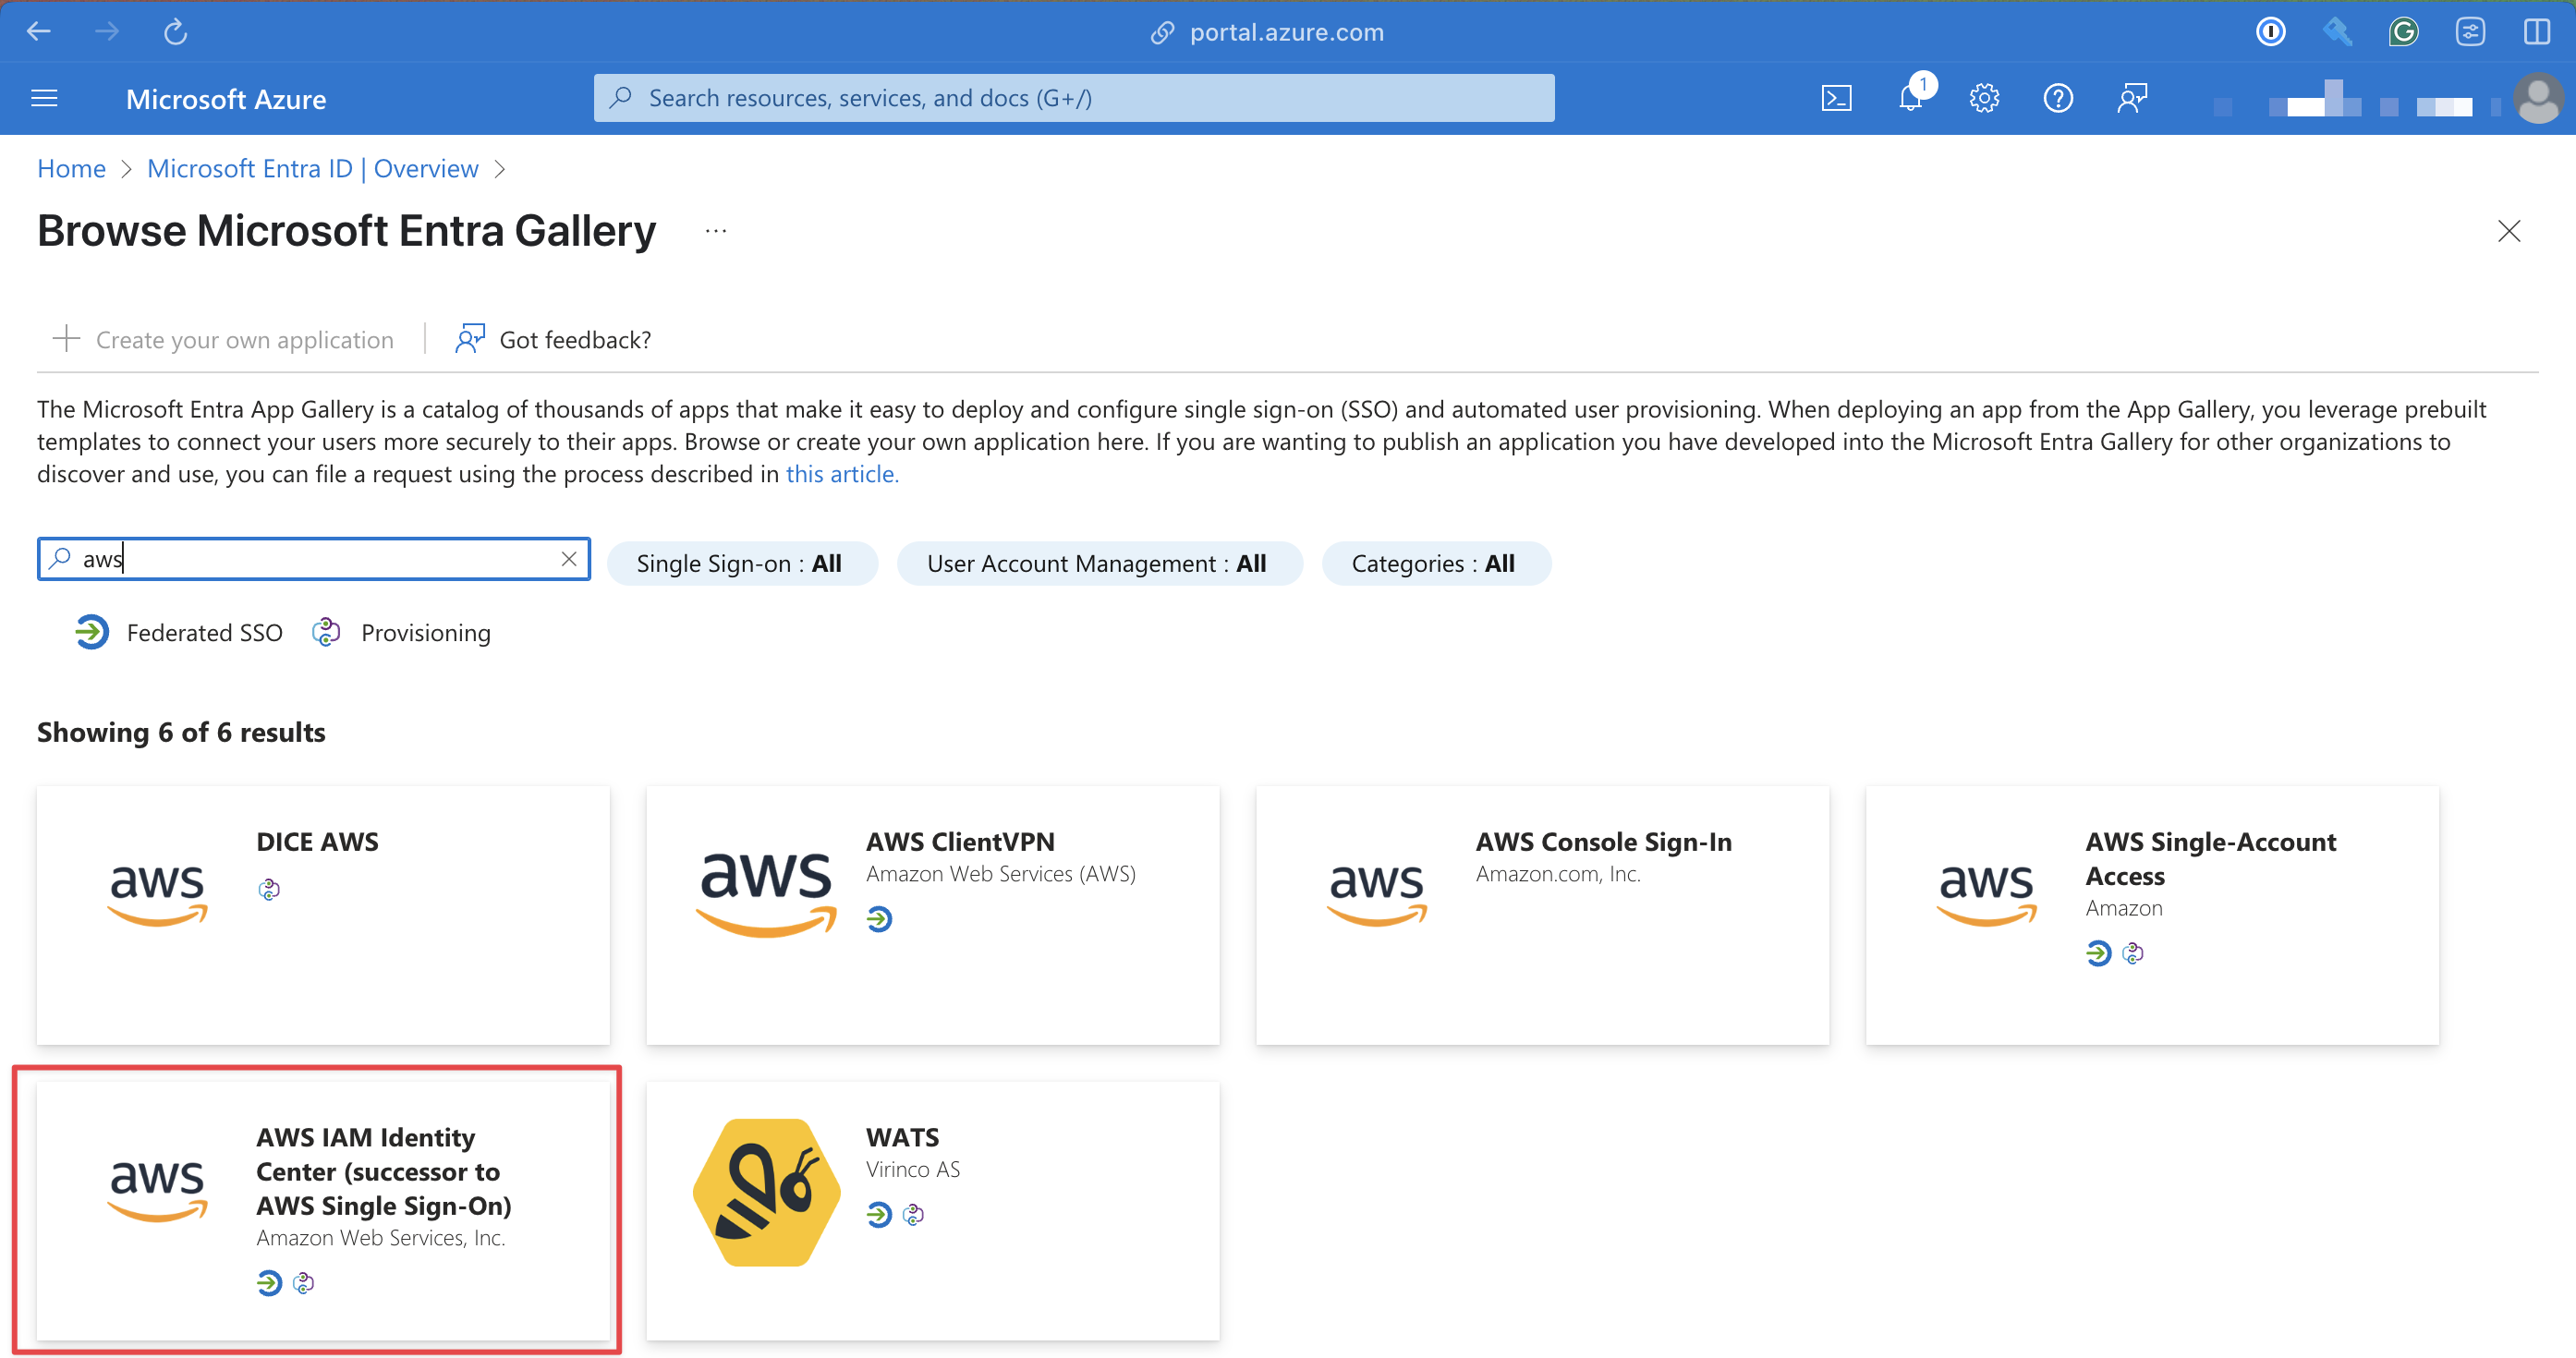
- Okta
- JumpCloud
- Microsoft Entra ID
- Google Workspace
- Other External IdPs
Okta is a common business suite that has an active director to manage users and permissions. We can utilize this to login to AWS by leveraging Applications that are used to sign in to things from your Okta Account.
Setup Okta
- Under the Admin Panel go to Applications
- Click Browse App Catalog
- Search for
AWS IAM Identity Centerand click Add Integration - Keep the default settings of App Label ("AWS IAM Identity Center") and Application Visibility
- Go to Sign On and Copy information from the SAML Metadata section, this will be used in AWS SSO.
- Then go to Provisioning and click Configure API Integration
Setup AWS SSO
- Sign into AWS SSO under your management account (
core-root) - Go to the AWS IAM Identity Center (successor to AWS Single Sign-On) application
- Enable IAM Identity Center
- On the left panel click Settings
- Under Identity Source click edit and add an External identity provider
- Copy the information from Okta into the fields
- The Okta App will need to be updated with the Service provider metadata
JumpCloud is a cloud-based directory service that provides secure, frictionless access to AWS resources. It can be used as an identity provider for AWS (Amazon Web Services) through a feature called AWS Single Sign-On (AWS SSO).
Follow the JumpCloud official documentation for setting up JumpCloud with AWS IAM Identity Center:
Integrate with AWS IAM Identity Center
The official AWS documentation for setting up JumpCloud with AWS IAM Identity Center is not accurate. Instead, please refer to the JumpCloud official documentation
Microsoft Entra ID (formerly known as Office 365, Microsoft 365, Azure AD) can be used as an identity provider for AWS (Amazon Web Services) through a feature called AWS Single Sign-On (AWS SSO).
AWS SSO allows organizations to centralize identity management and provide users with seamless access to AWS resources using their existing Microsoft Entra ID credentials.
Setup Microsoft Entra ID
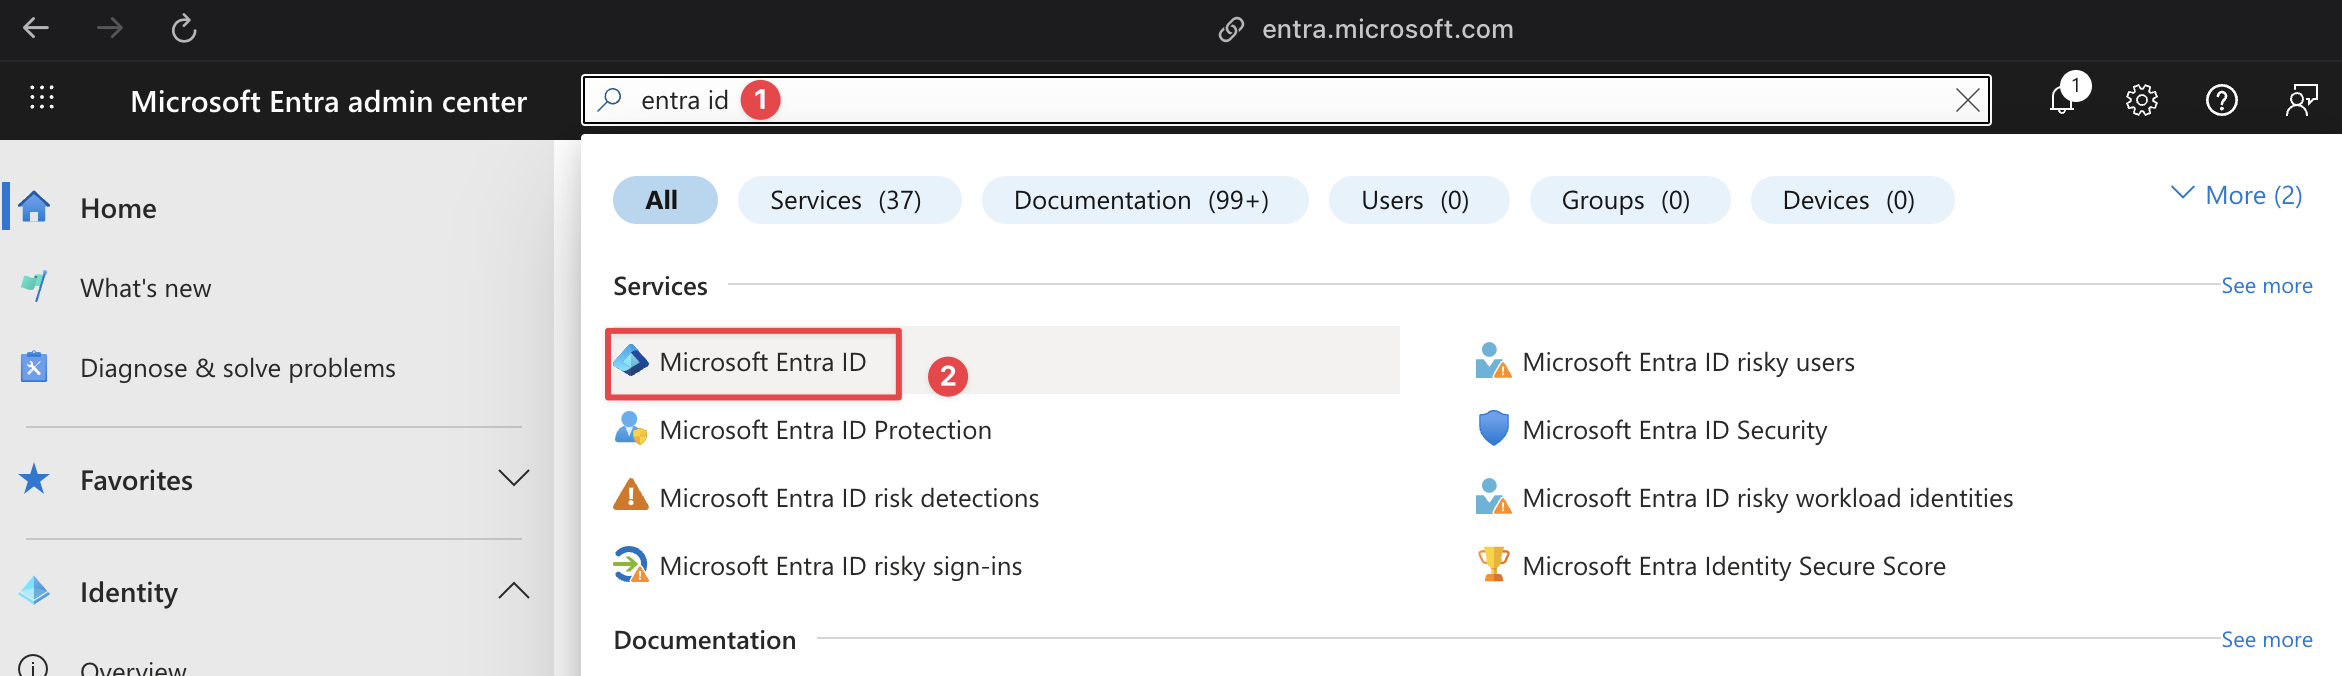
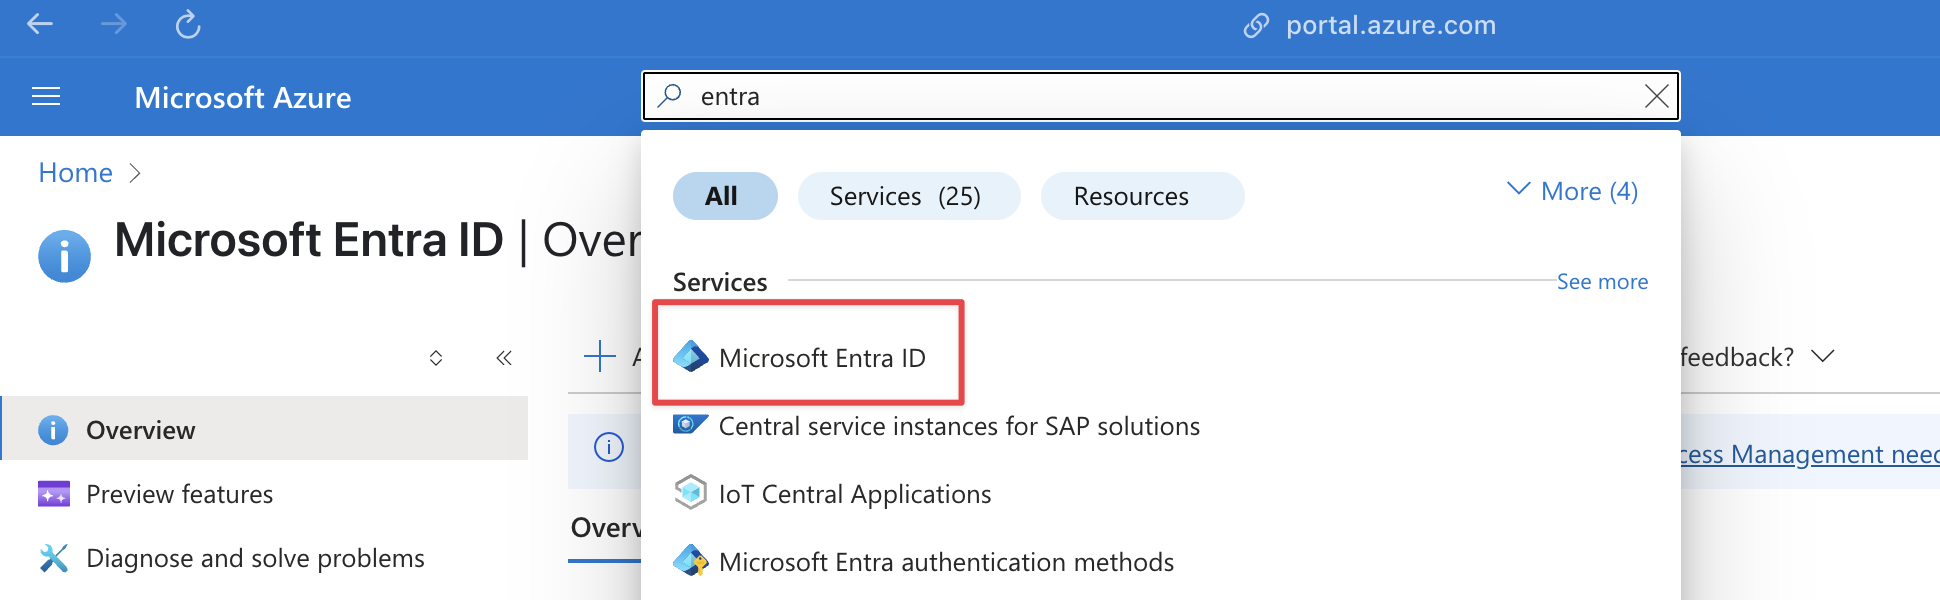
1 Open Microsoft Entra ID Application
- Microsoft Entra ID
- Azure
Go to Microsoft Entra's Admin Center and search for Entra ID
Go to Microsoft Azure and search for Entra ID
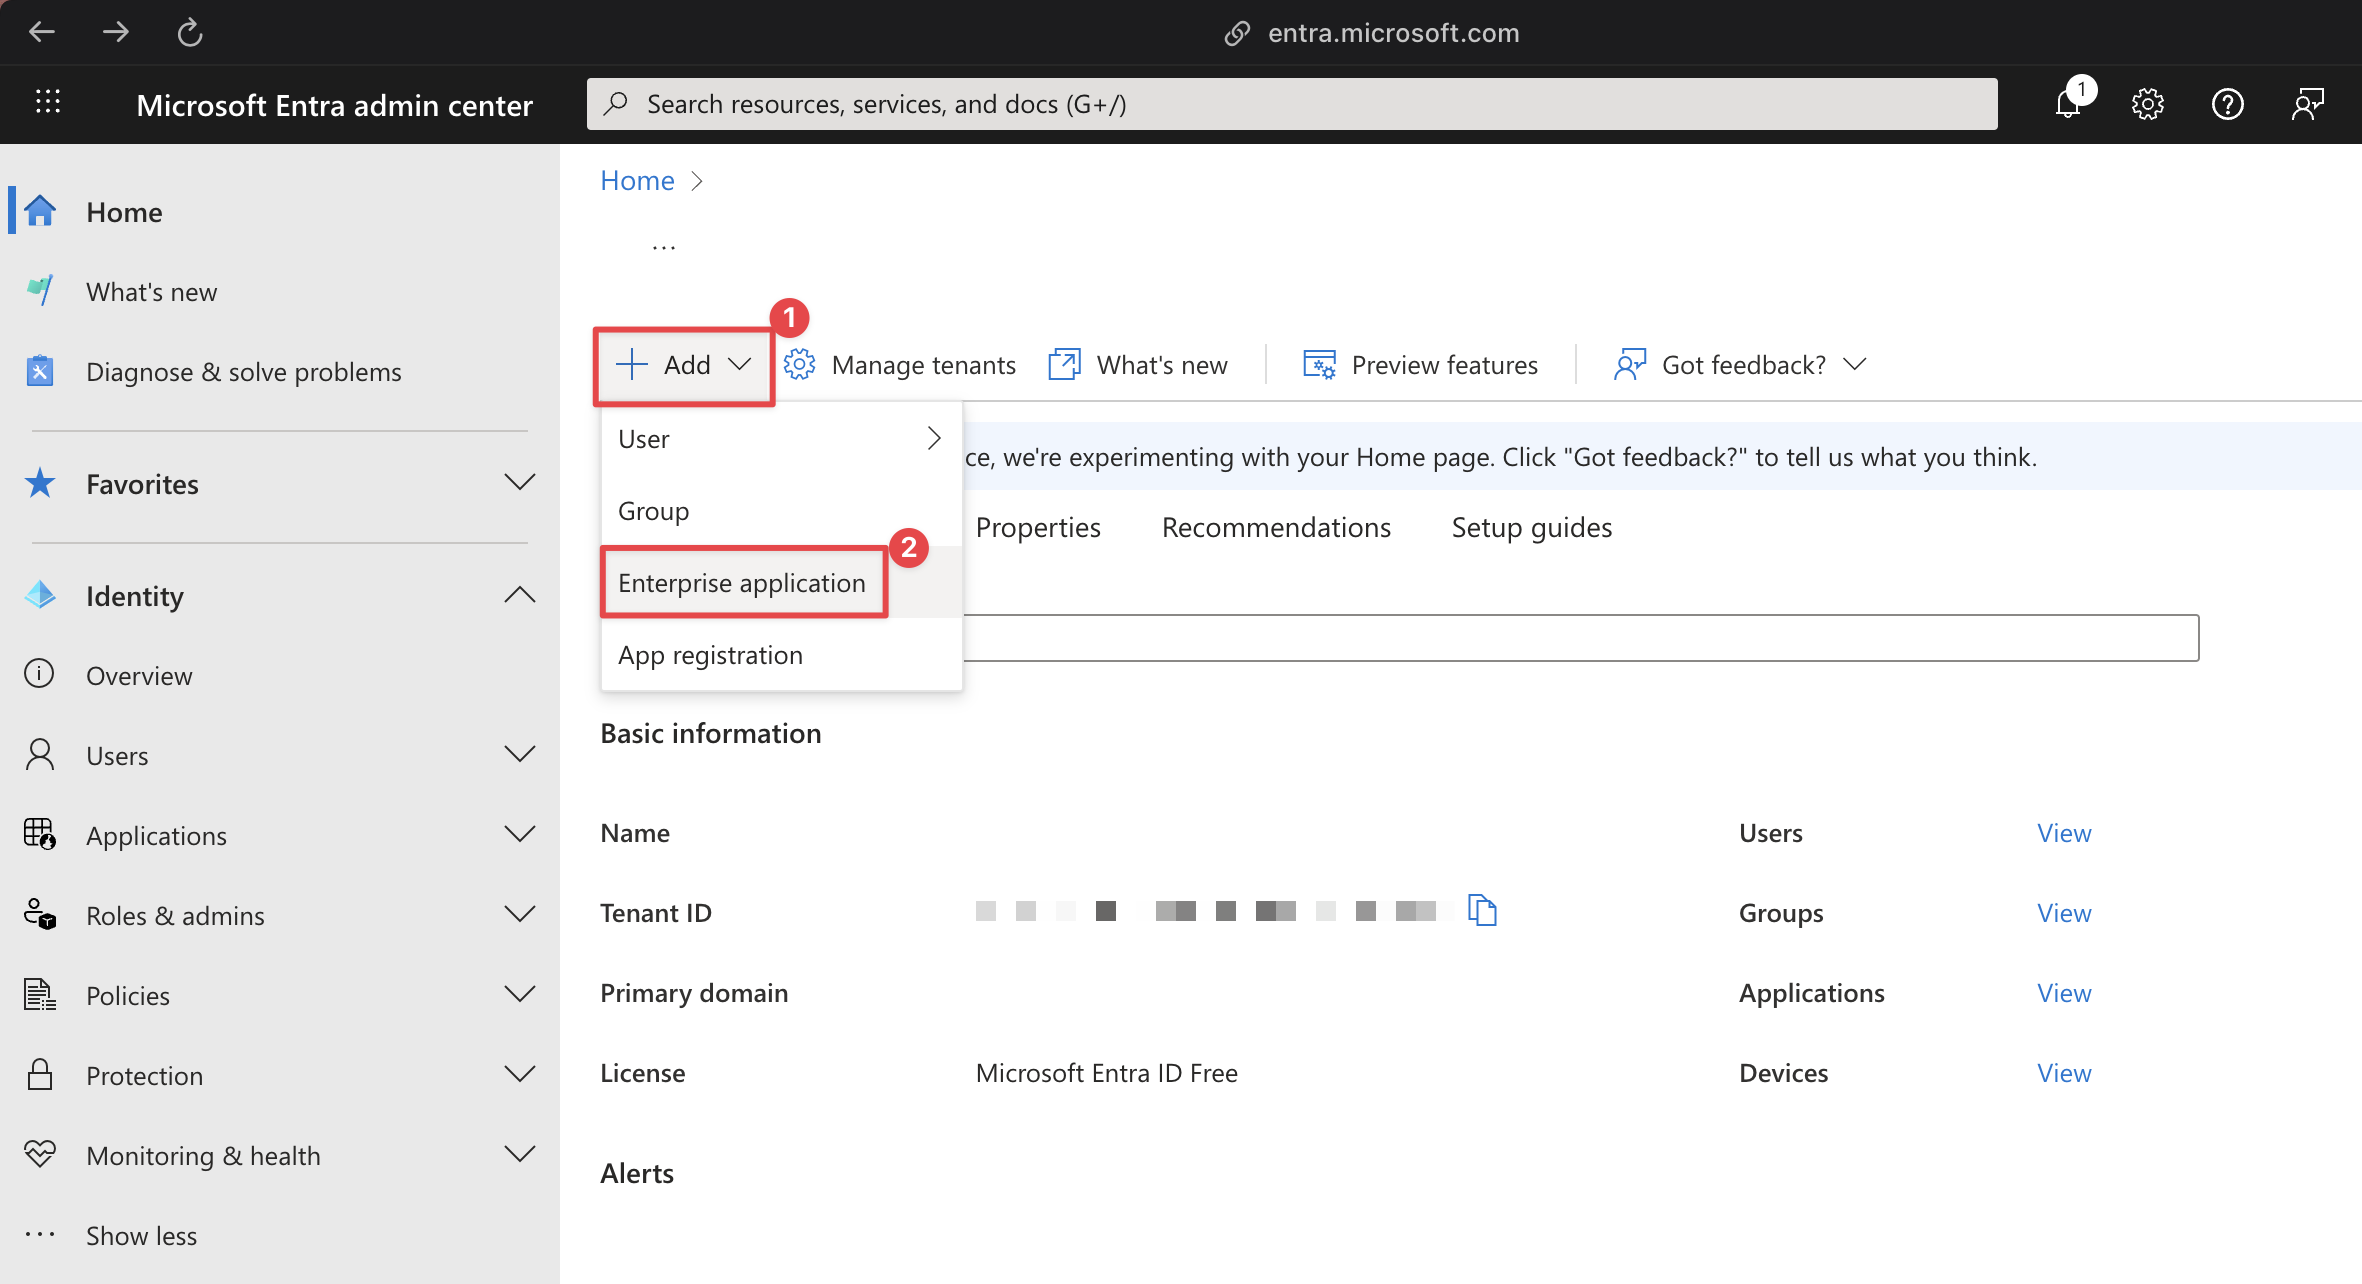
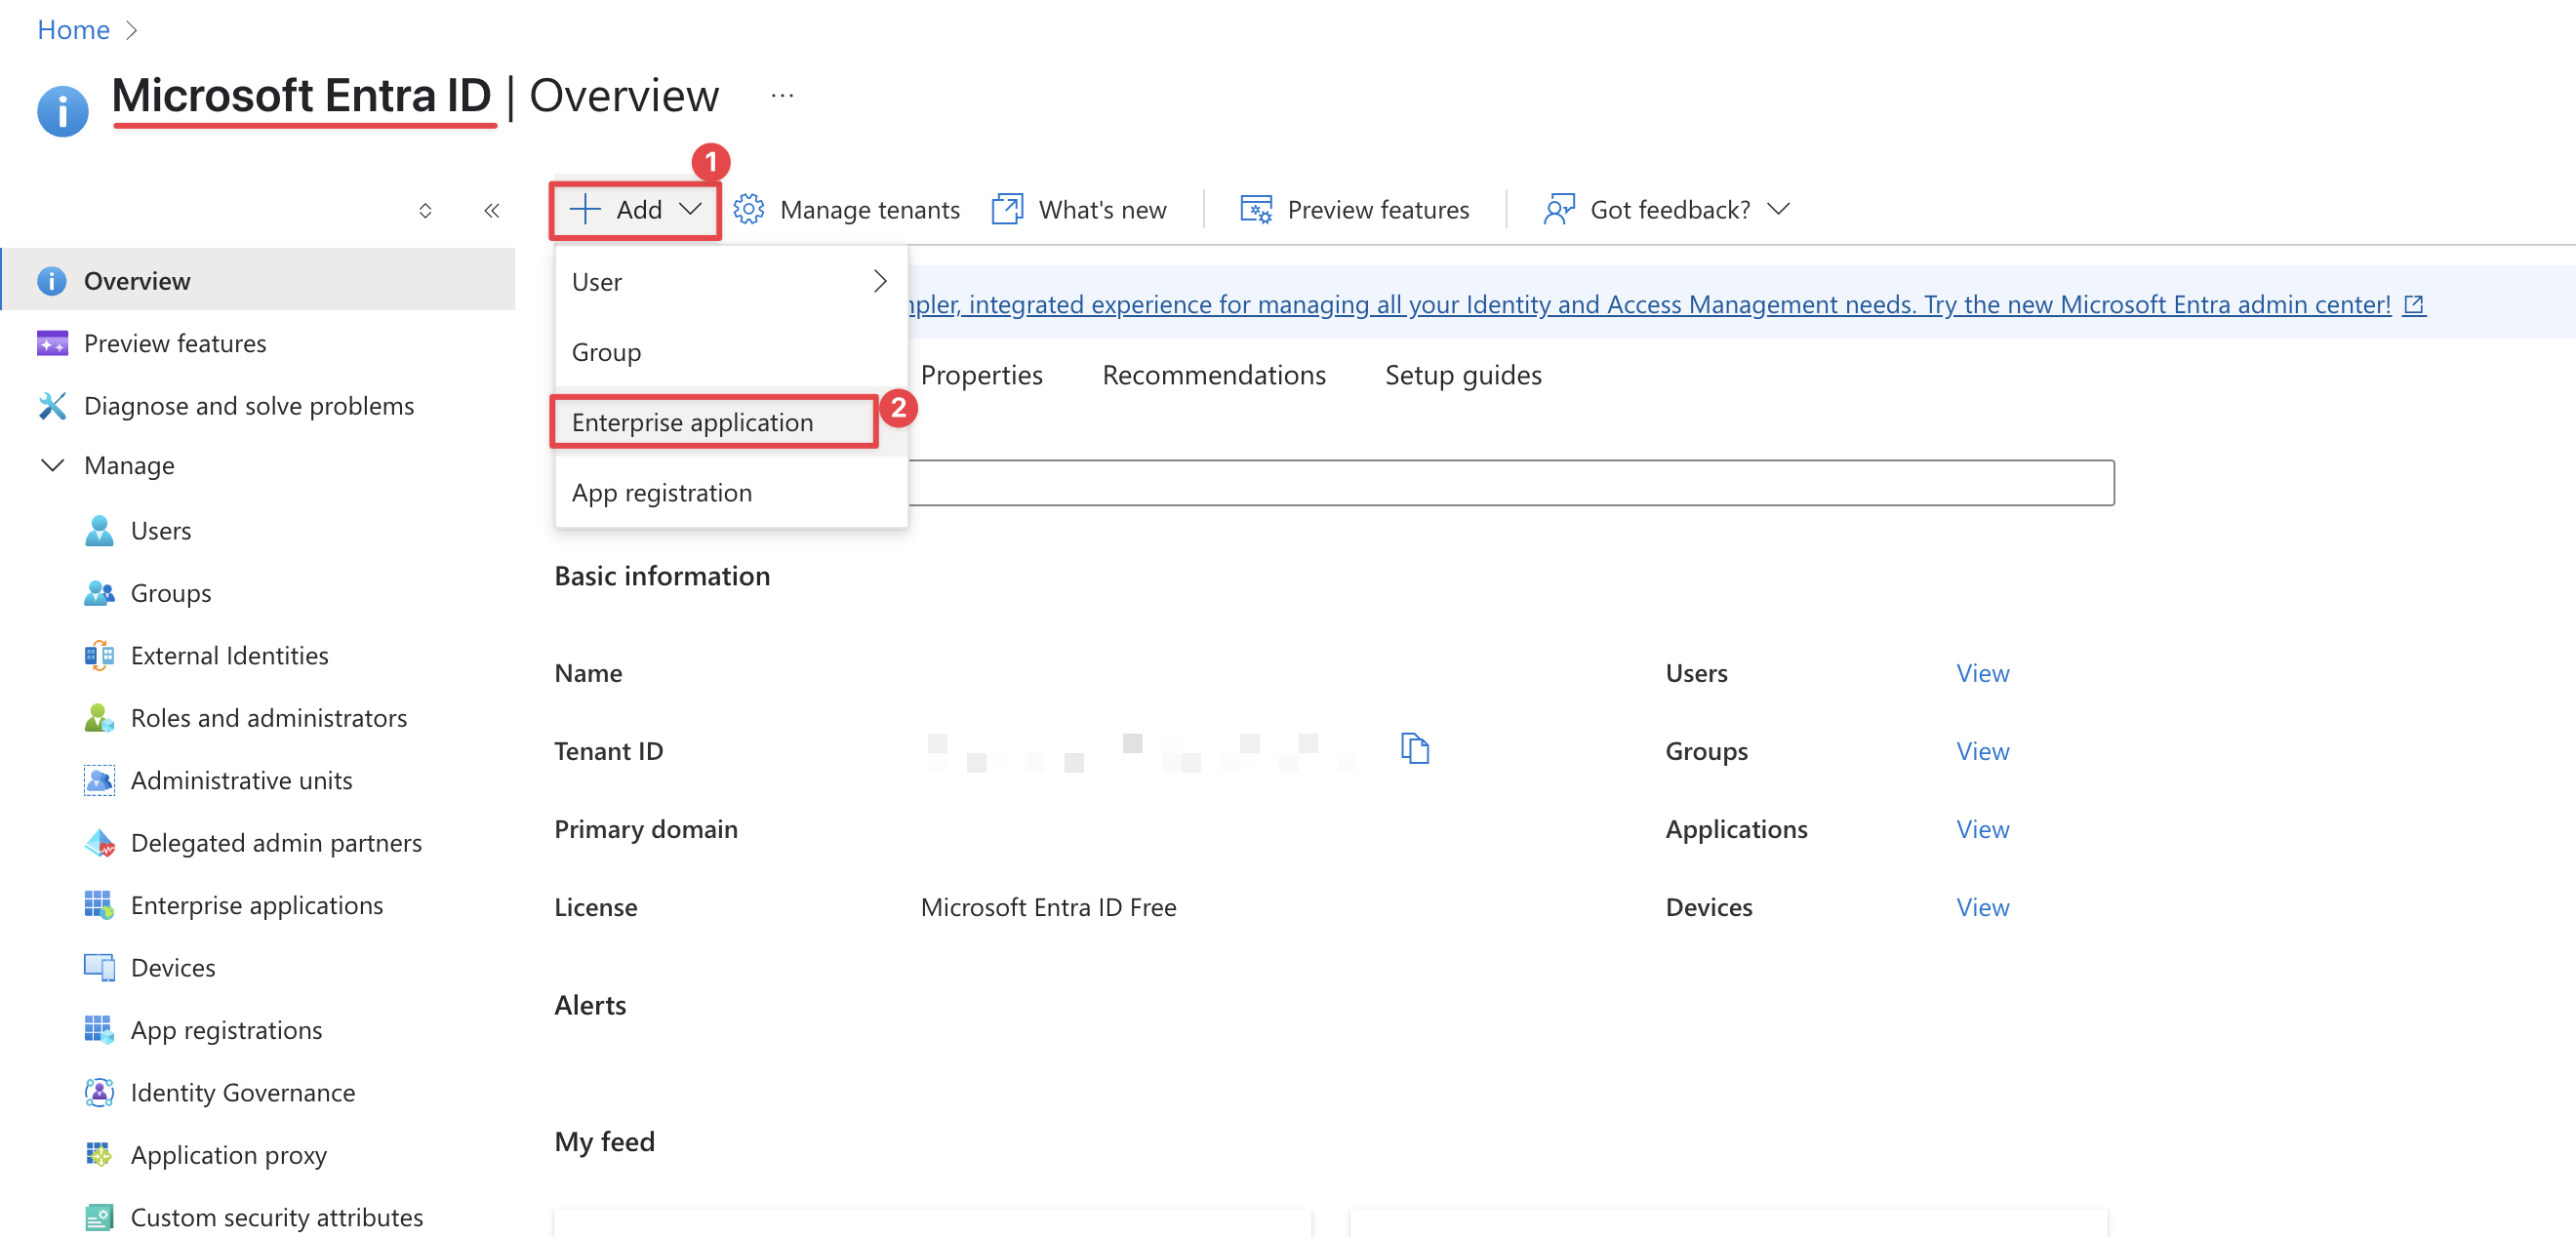
2 Add AWS IAM Identity Center as an Enterprise Application
Click Add then Enterprise Application
Then select AWS IAM Identity Center (successor to AWS Single Sign-On)
- Microsoft Entra ID
- Azure

Click Create, default options are fine
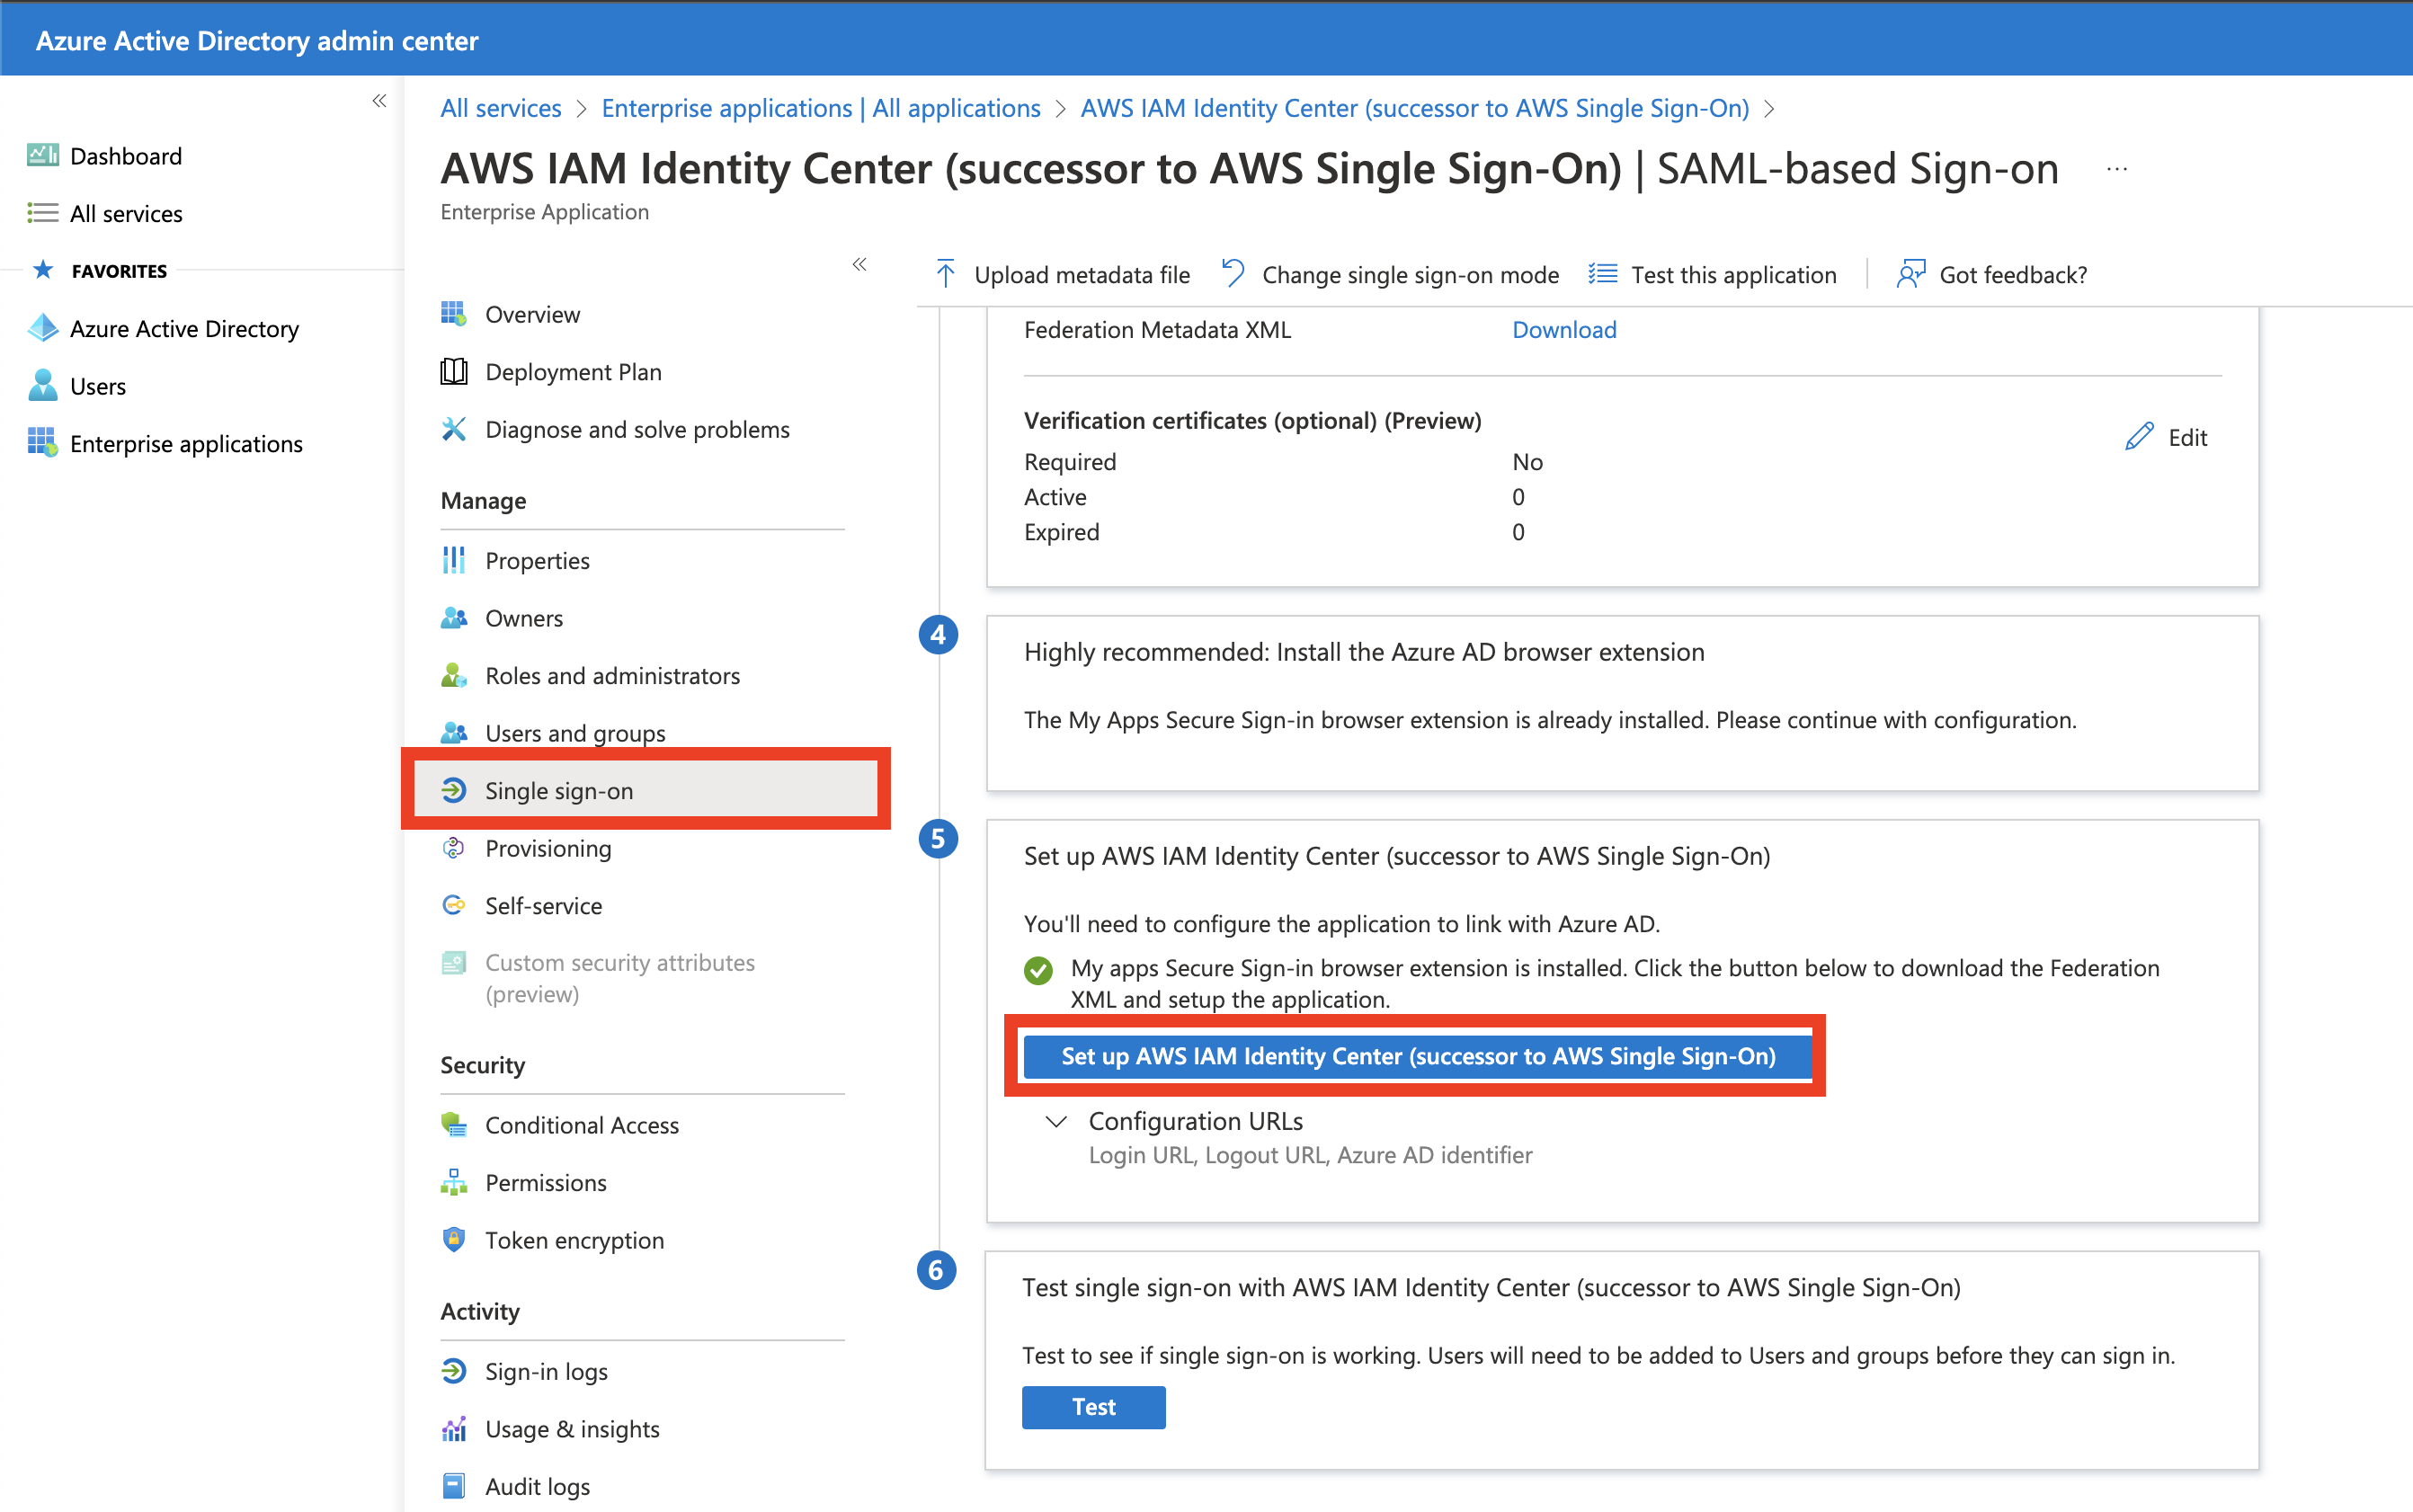
3 Download the Microsoft Entra ID Metadata XML File
On the left panel click Single sign-on, then download the XML SAML metadata file by pressing the button on step 5 Set up AWS IAM Identity Center (successor to AWS Single Sign-On)
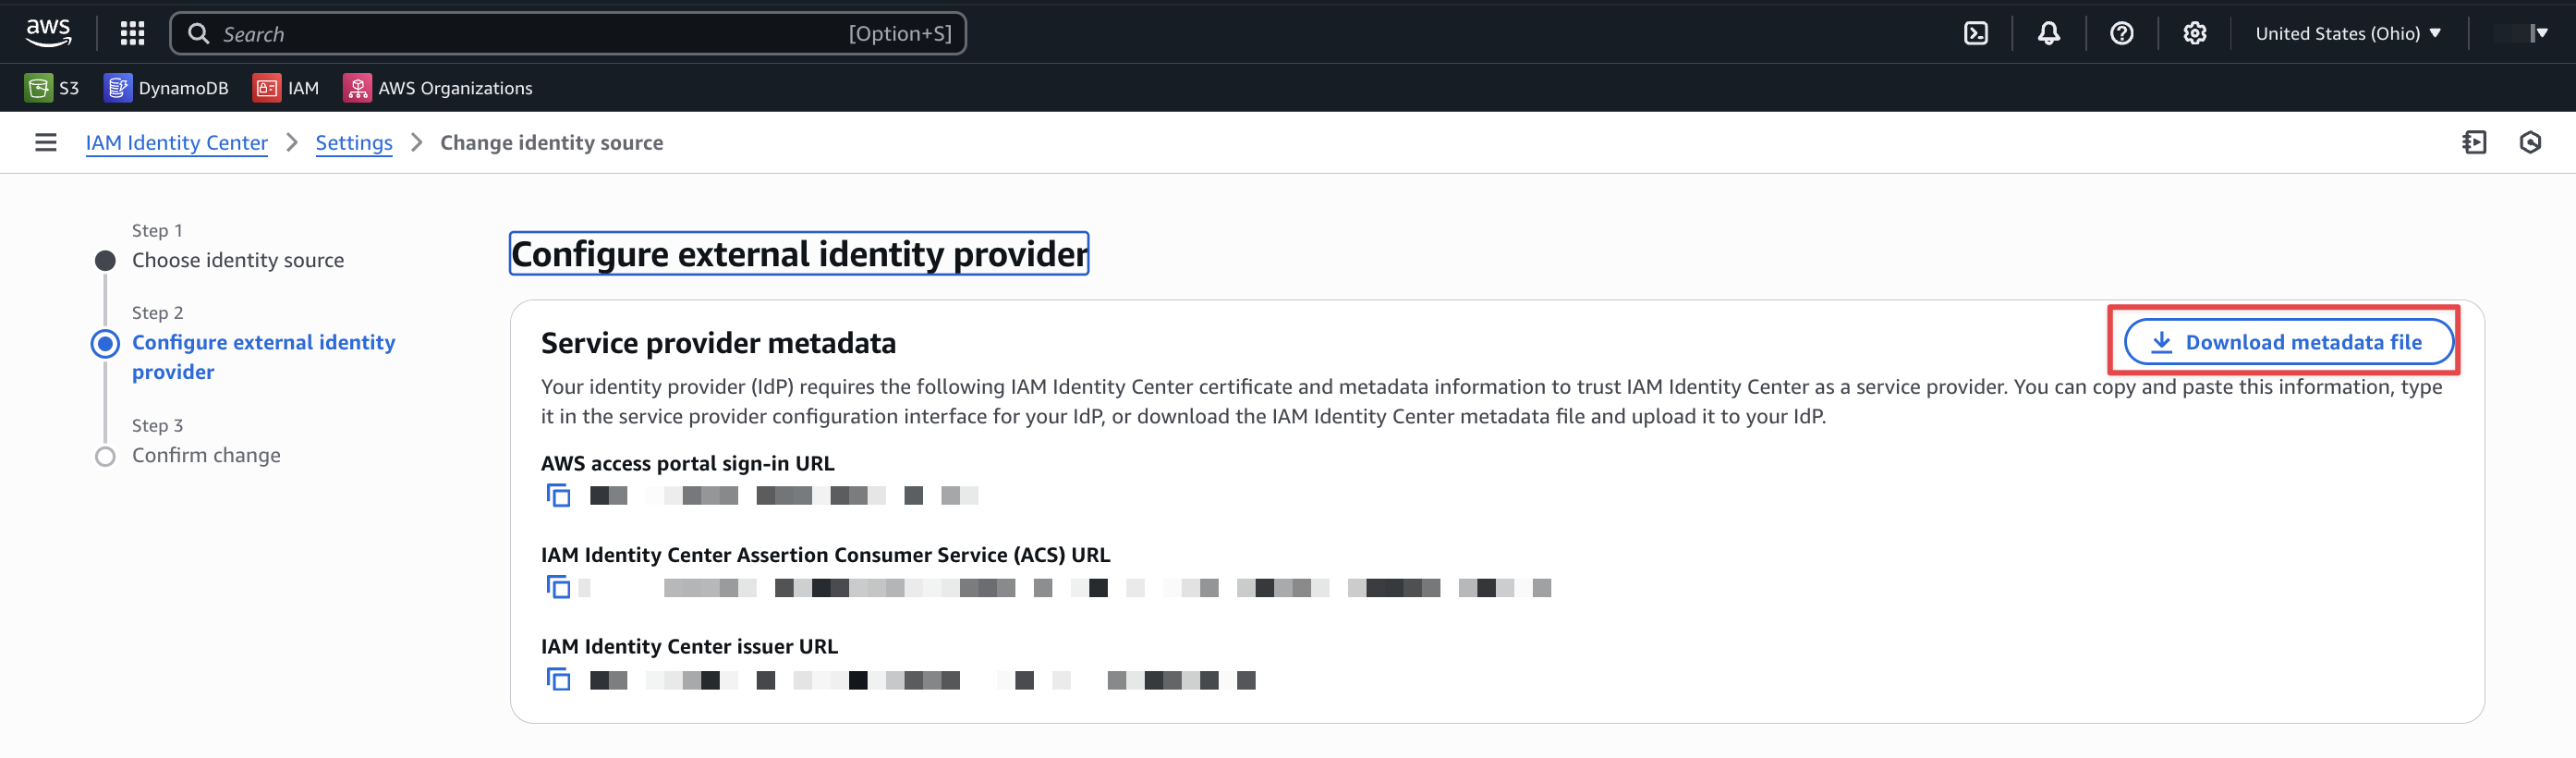
4 Download the AWS IAM Identity Center Metadata XML File
Navigate to the AWS IAM Identity Center (successor to AWS Single Sign-On) application in AWS IAM Identity Center.
Go to Setup/Change Identity Source, click External identity provider from the available identity sources. Click Next.
Download the XML SAML Metadata file by clicking Download metadata file.
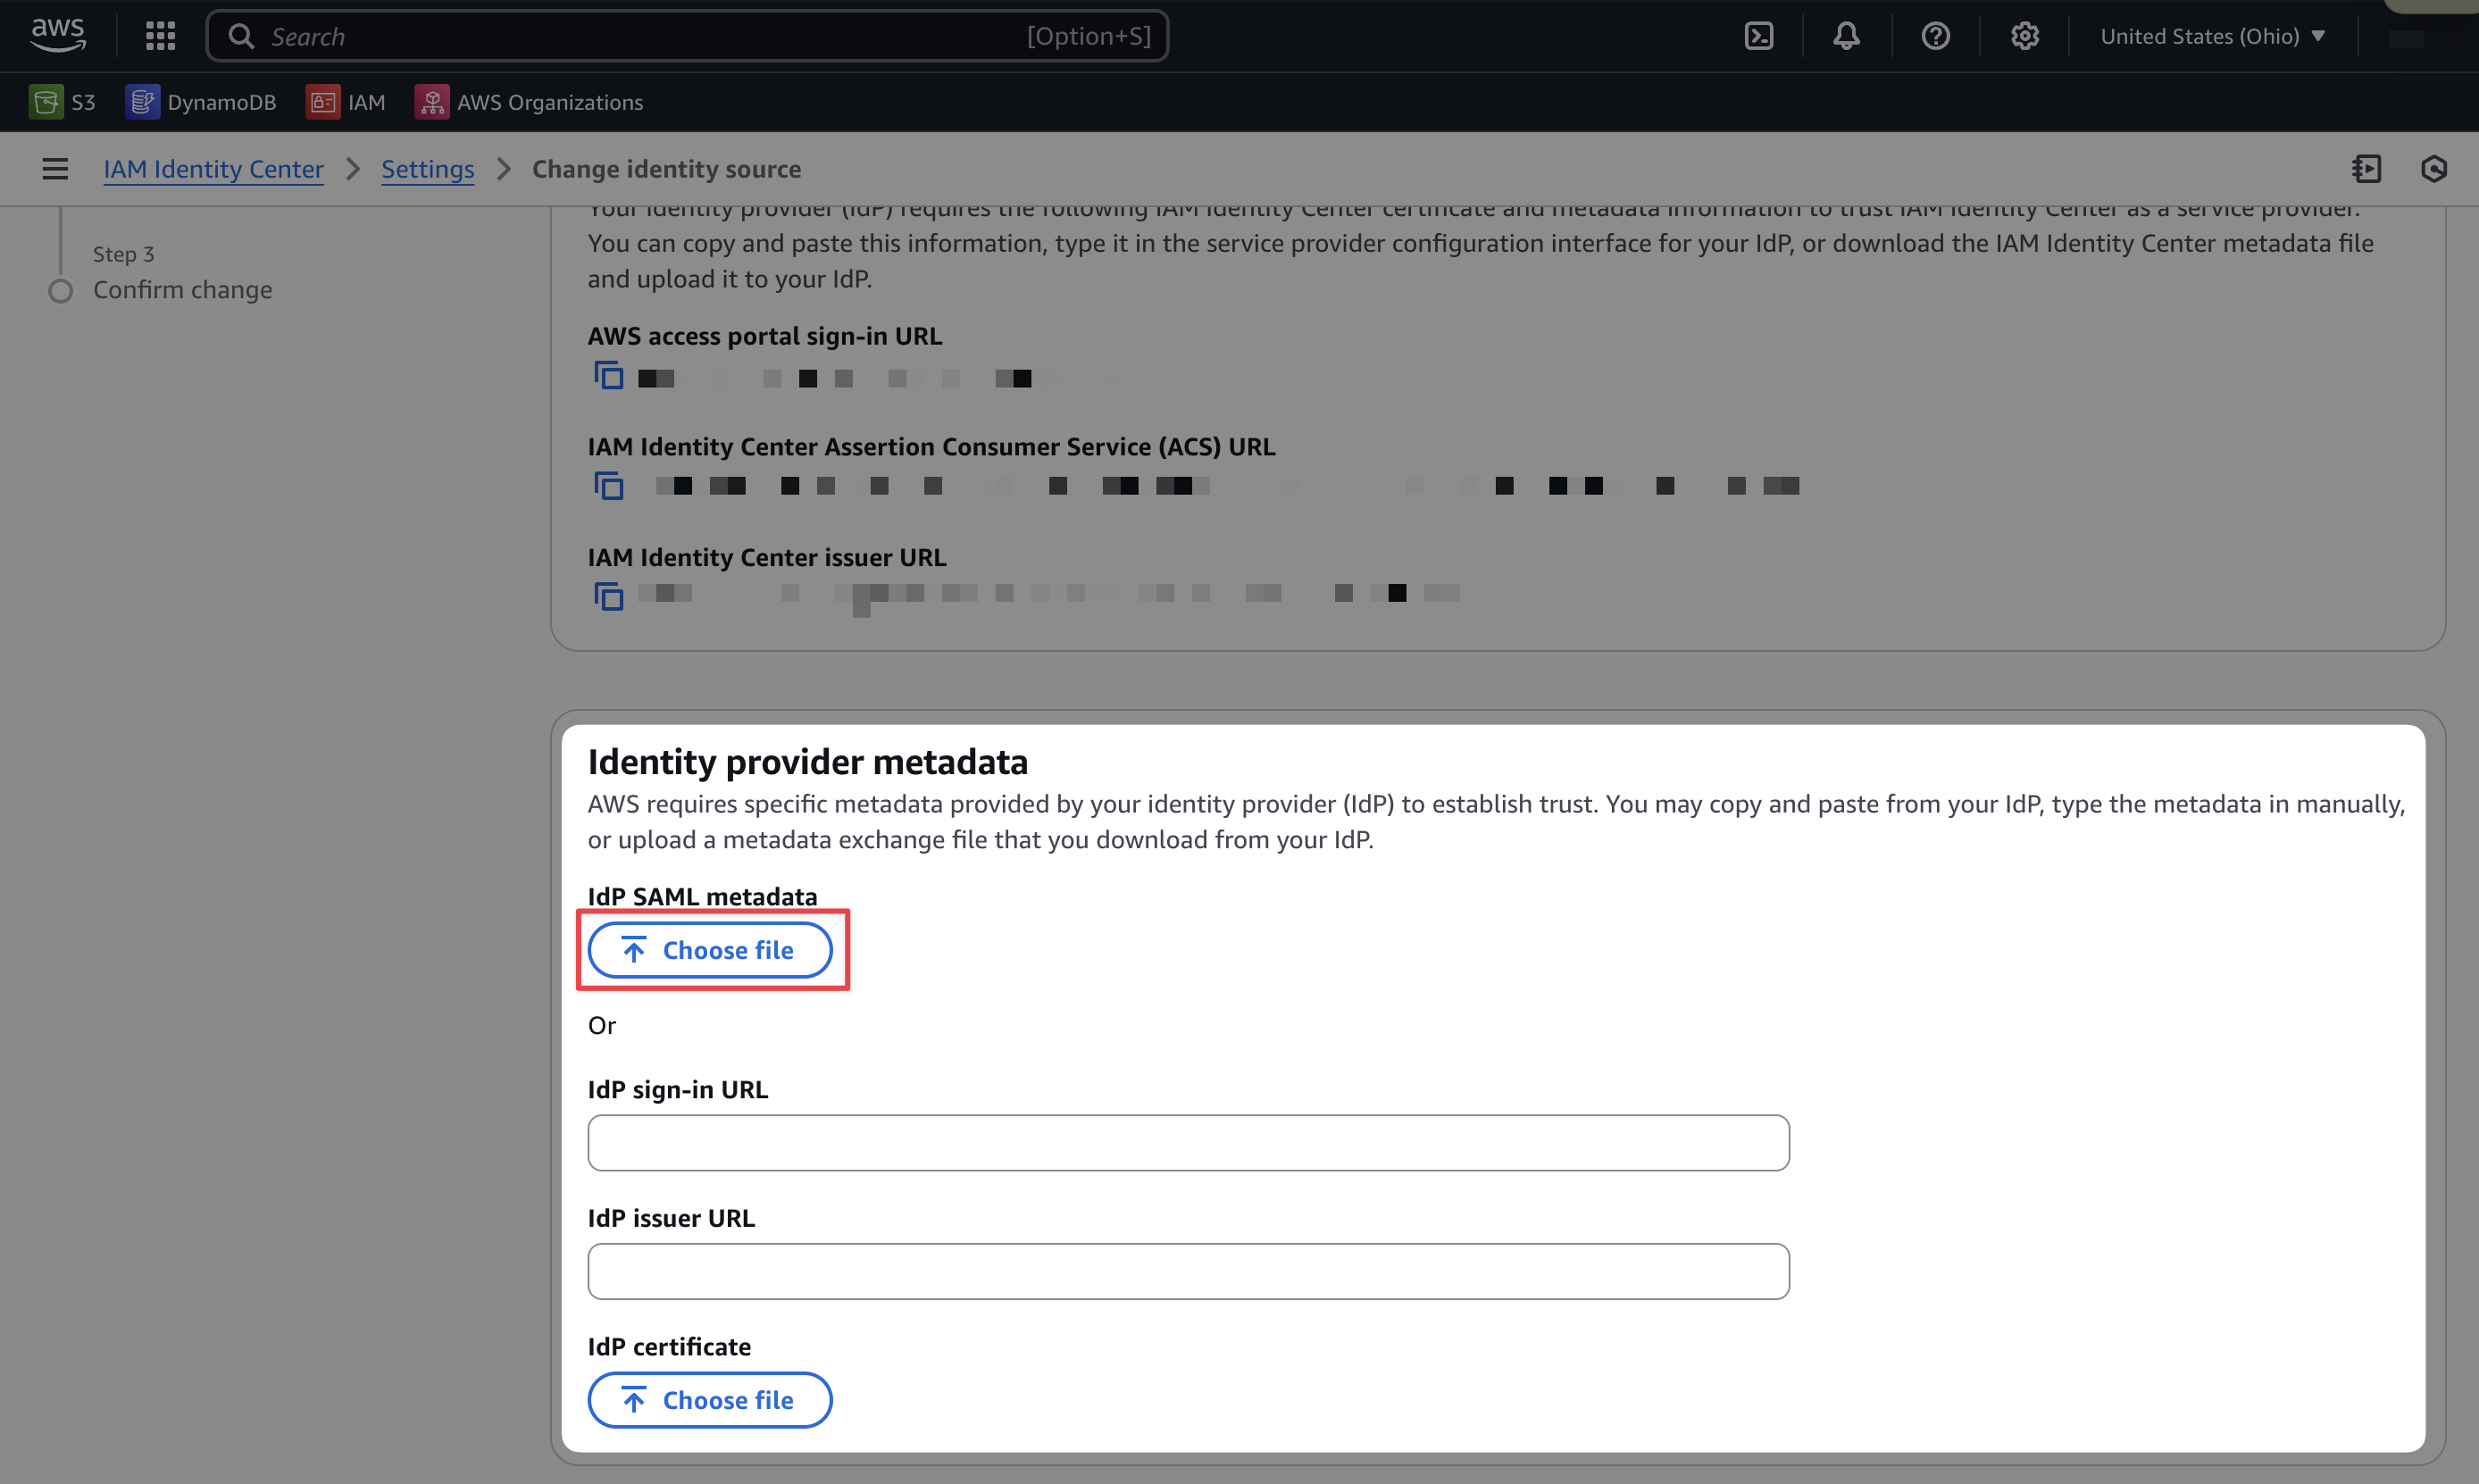
5 Upload the Microsoft Entra ID Metadata XML File to AWS
Upload the XML SAML metadata file from Microsoft Entra ID to AWS IAM Identity Center.
6 SAVE
Click Save to save the changes.
Automatic Provisioning
1 Generate SCIM URL and Secret
In AWS IAM Identity Center, you can set up automatic provisioning by generating a URL and secret

2 Navigate to the new App
Go to Your newly created App for Single Sign On in Microsoft Entra ID, on
the left Panel go to Provisioning.
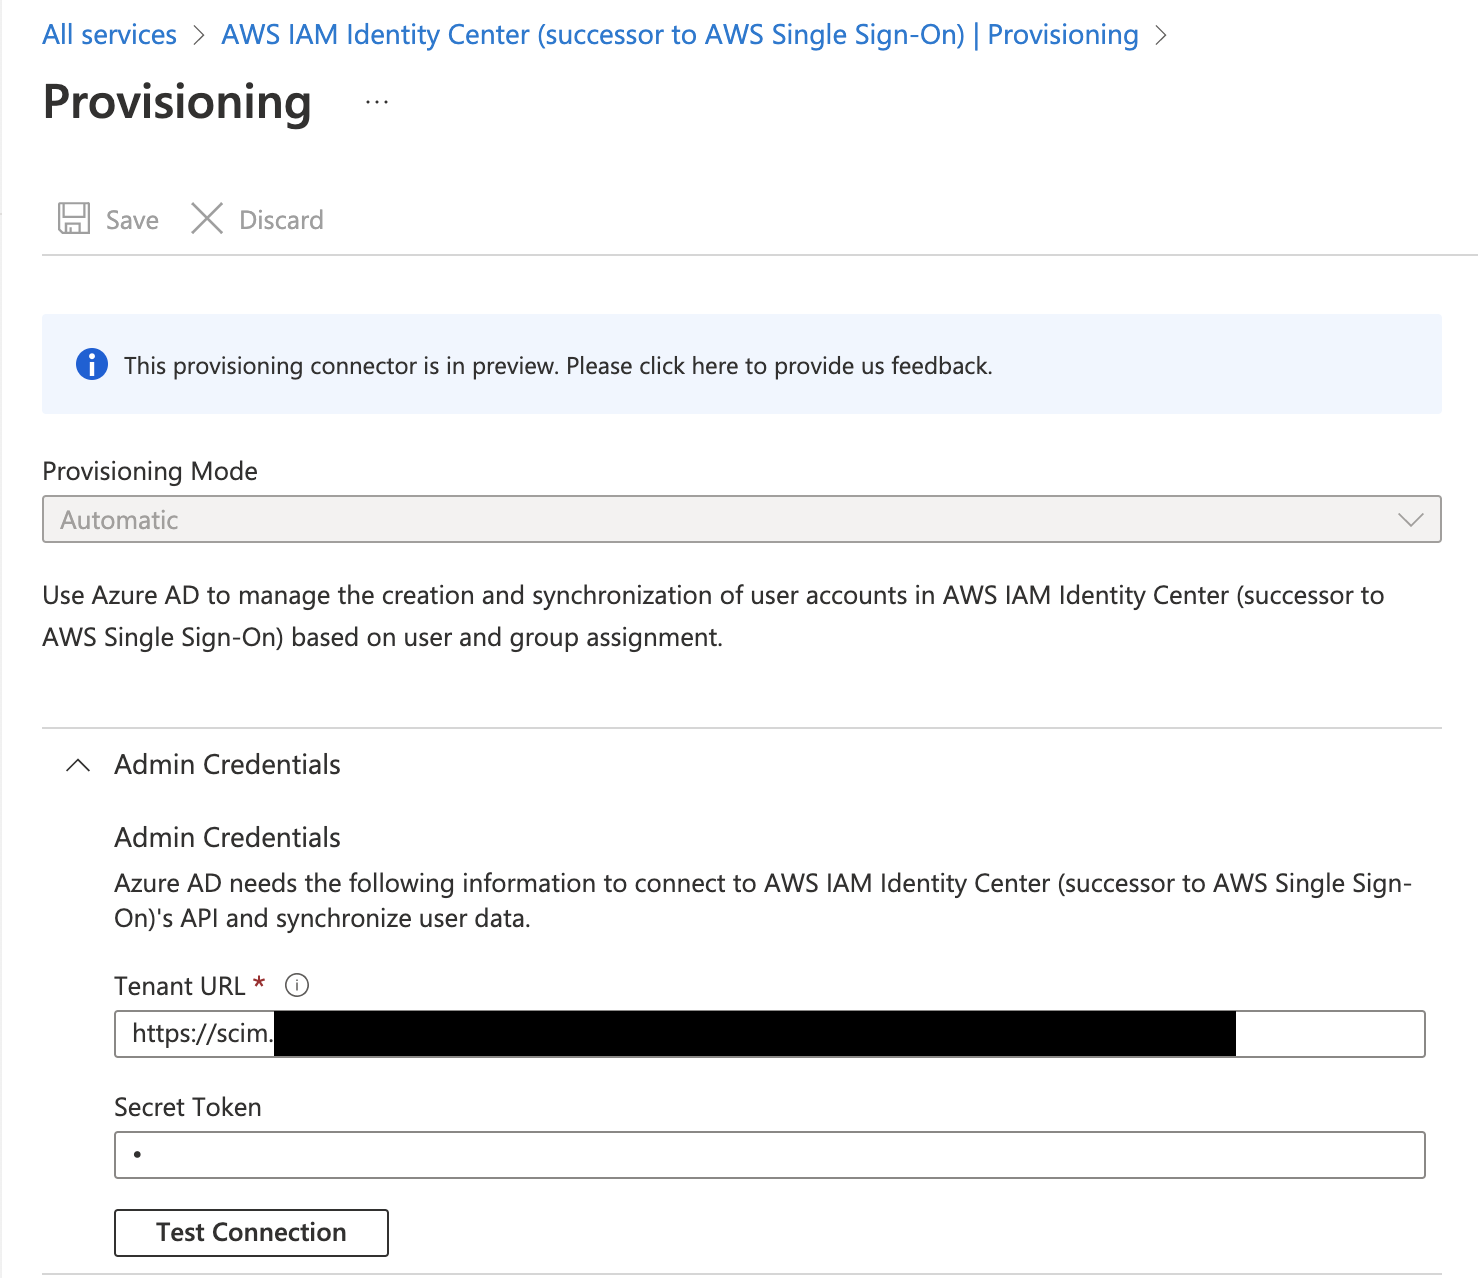
4 Verify Connection
Click Test Connection to verify the connection.
Google Workspace (formerly GSuite) can be used as an identity provider for AWS IAM Identity Center using SAML authentication and SCIM provisioning. This setup requires a Google Workspace super administrator account.
Google Workspace's SCIM automatic provisioning only syncs users, not groups. Groups must be created manually in
AWS Identity Center or synced using the ssosync tool.
Please see our aws-ssosync component for details.
Setup Google Workspace SAML Application
1 Create the SAML Application in Google
Sign in to the Google Admin console with super administrator privileges. Navigate to Apps > Web and Mobile Apps, select Add app > Search for apps, and search for Amazon Web Services. Select the SAML app.
On the Google Identity Provider details page, download the IdP metadata file. Keep this page open.
2 Change the Identity Source in AWS
Sign in to the IAM Identity Center console in the core-root account.
Go to Settings > Actions > Change identity source. Select External identity provider and click Next.
Upload the Google IdP metadata file you downloaded in the previous step.
Copy these two values from IAM Identity Center (you will need them in the next step):
- Assertion Consumer Service (ACS) URL
- IAM Identity Center issuer URL
3 Configure Service Provider Details in Google
Return to the Google Admin console. On the Service provider details page, enter:
- ACS URL: Paste the IAM Identity Center ACS URL
- Entity ID: Paste the IAM Identity Center issuer URL
- Start URL: Leave empty
- Name ID format: Select
EMAIL - Name ID: Select
Basic Information > Primary email
Click Continue.
4 Configure Attribute Mapping in Google
On the Attribute Mapping page, click ADD MAPPING and configure:
| Google Directory Attribute | App Attribute |
|---|---|
| Basic Information > Primary Email | https://aws.amazon.com/SAML/Attributes/RoleSessionName |
Click Finish. Then return to the IAM Identity Center console, review the configuration, type ACCEPT, and click Change identity source.
5 Enable the Application in Google Workspace
Return to the Google Admin Console. Navigate to Apps > Web and Mobile Apps and open the AWS IAM Identity Center application. Expand User access, set the Service status to ON for everyone, and click Save.
Enable Automatic User Provisioning (SCIM)
1 Generate SCIM Credentials in AWS
In IAM Identity Center, go to Settings and locate Automatic provisioning. Click Enable. Copy both the SCIM endpoint URL and the Access token. These values are only shown once.
2 Configure Auto Provisioning in Google
Return to the Google Admin Console and open the AWS IAM Identity Center application. In the Auto provisioning section, click Configure auto provisioning.
Paste the Access token and SCIM endpoint URL from the previous step. Verify the attribute mappings, optionally select a provisioning scope (Google Workspace group), and configure deprovisioning settings. Click Finish.
Toggle auto provisioning from Inactive to Active.
3 Verify User Sync
Return to IAM Identity Center and check the Users page. Users from Google Workspace should appear within a few minutes, though provisioning can take up to 24 hours.
- AWS: Configure Google Workspace as an IdP — Official AWS guide including SAML setup (Step 1) and user provisioning (Step 3)
- AWS Blog: How to use Google Workspace as an external identity provider for AWS IAM Identity Center
For identity providers not explicitly listed above, set up the integration with a custom external identity provider. The steps may differ for each IdP, but the goal is ultimately the same: configure SAML authentication and user provisioning between your IdP and AWS IAM Identity Center.
For providers not included in this guide, refer to the AWS documentation for supported IdP integrations, which includes CyberArk, OneLogin, Ping Identity, and others.
1 Open the Identity account (core-root) in the AWS Console
2 On the Dashboard page of the IAM Identity Center console, select Choose your identity source
3 In the Settings, choose the Identity source tab, select the Actions dropdown, and then select Change identity source
4 Select External identity provider from the available identity sources. Download the Service provider metadata from AWS — you will need this for your IdP
5 Open your chosen IdP and create a new SAML/SSO application
6 Download the new app's IdP metadata and upload it to AWS IAM Identity Center
7 Fill in the Service provider details in your IdP using the data from IAM Identity Center:
- ACS URL: The IAM Identity Center Assertion Consumer Service (ACS) URL
- Entity ID: The IAM Identity Center issuer URL
- Start URL: Leave empty
- Name ID format: Select
EMAIL
8 Enable the application for the appropriate users or groups in your IdP
9 Configure automatic provisioning (SCIM) if supported by your IdP, or manually create users and groups in AWS Identity Center
10 Create groups in your IdP (or AWS Identity Center) to match the groups expected by the aws-sso component. See the Required Groups section below
If set up properly, users added to your IdP will automatically populate in AWS Identity Center.
Required Groups
Before deploying the aws-sso component, you must create the following groups in your Identity Provider. These names are case-sensitive and must match exactly:
- Managers — Full access to all accounts
- DevOps — Full access to most accounts (except root)
- Developers — Limited access for development work
- BillingAdmin — Access to billing and cost management
Once these groups are provisioned and synced to AWS Identity Center, you can deploy the aws-sso component.
Deploy Permission Sets
The aws-sso component deploys all Permission Sets and assigns them to the appropriate groups. This includes:
TerraformApplyAccess— Write access for Terraform operationsTerraformPlanAccess— Read-only access for Terraform plan operationsTerraformStateAccess— Access to Terraform state onlyAdministratorAccess— Full AWS administrator accessPowerUserAccess— Power user access without IAM managementReadOnlyAccess— Read-only access to AWS resourcesRootAccess— Organizational root access for privileged operations (see Centralized Root Access)
The aws-sso component is responsible for deploying all Permission Sets and mapping them to the appropriate groups per account. This mapping is configured in stacks/catalog/aws-sso.yaml, where you define which groups receive which Permission Sets for each account type. This is how you assign permissions to users — by adding them to the appropriate IdP group, they automatically receive the corresponding Permission Sets when they access AWS.
Deploy the component using the identity workflow:
The aws-sso component will fail if the required groups (Managers, DevOps, Developers, BillingAdmin) do not exist in AWS Identity Center. Ensure your IdP is configured and groups are synced before deploying.
Next Steps
Centralize root access
Now that Identity Center and Permission Sets are provisioned, configure centralized root access management. This allows secure, auditable root operations on member accounts without maintaining root credentials. Centralize Root Access